Installing Notrika License Plate

Notrika license plate software can be installed on Windows 7, 8, 10, and 11.

Alert

Keep in mind that in order to install Notrika License Plate software on Windows 7, you must have downloaded and installed the latest Windows update.

To install the software, extract the nutrika license plate zip file or, if you have received the Notrika license plate DVD, insert it into your device and insert it into it.

Tips

Notrika license plate software is available in two versions: Softlock and Hardlock. How you activate the software depends on the type of software you have. During installation, you can detect the type of version you have available from the file name.

Clicking on the file Setup.exe the installation process will begin. The installation of the Notrika license plate reader software is in the form of a wizard, and all the prerequisites of the software will be installed on your system automatically through the execution of this file.

We move on to the next step by pressing the Next button.

You can change the installation location of the software via the Change button.

Once the installation location of the software is confirmed, click the OK button.

Now, by hitting the Install button, the installation of the software will begin.

At this point, the Notrika license plate software is being installed. Wait a few minutes for it to finish installing.

Now the installation process of Notrika License Plate has been completed. The installation process is completed by pressing the Finish button.
advanced divider

Activation of Notrika License Plate

After installing the software, you need to connect the dongle you received with the DVD to your system to activate.

Then run the Notrika license plate software from the desktop or installation site.

When the software is running, the login window will be displayed.

To log in to the software, you need to enter your username and password. By default, both the username and password for Notrika Plate software are admin, which you can change after logging in. After entering your username and password, click the login button. Your software is now fully activated and you can use it.

advanced divider

Plate Reading

Reading the license plate from the video

When you enter the Notrika license plate software, you will see an image as shown below. It may vary slightly depending on the version of your software.

By clicking on the button آیکون اضافه کردن ویدیو و دوربین 
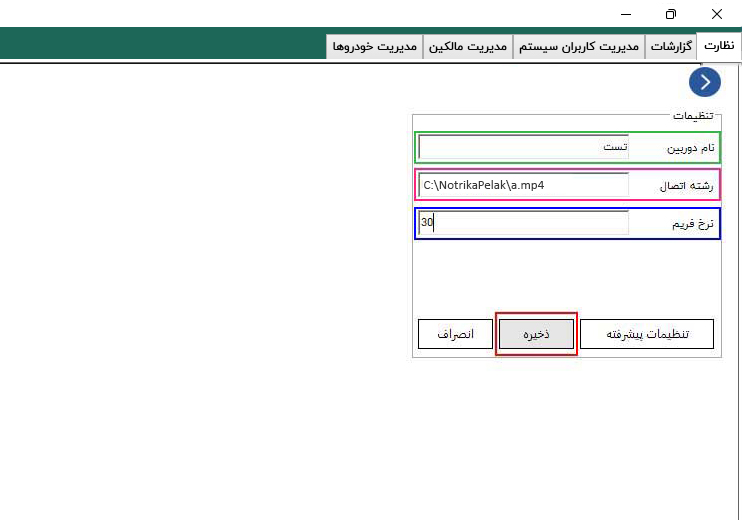
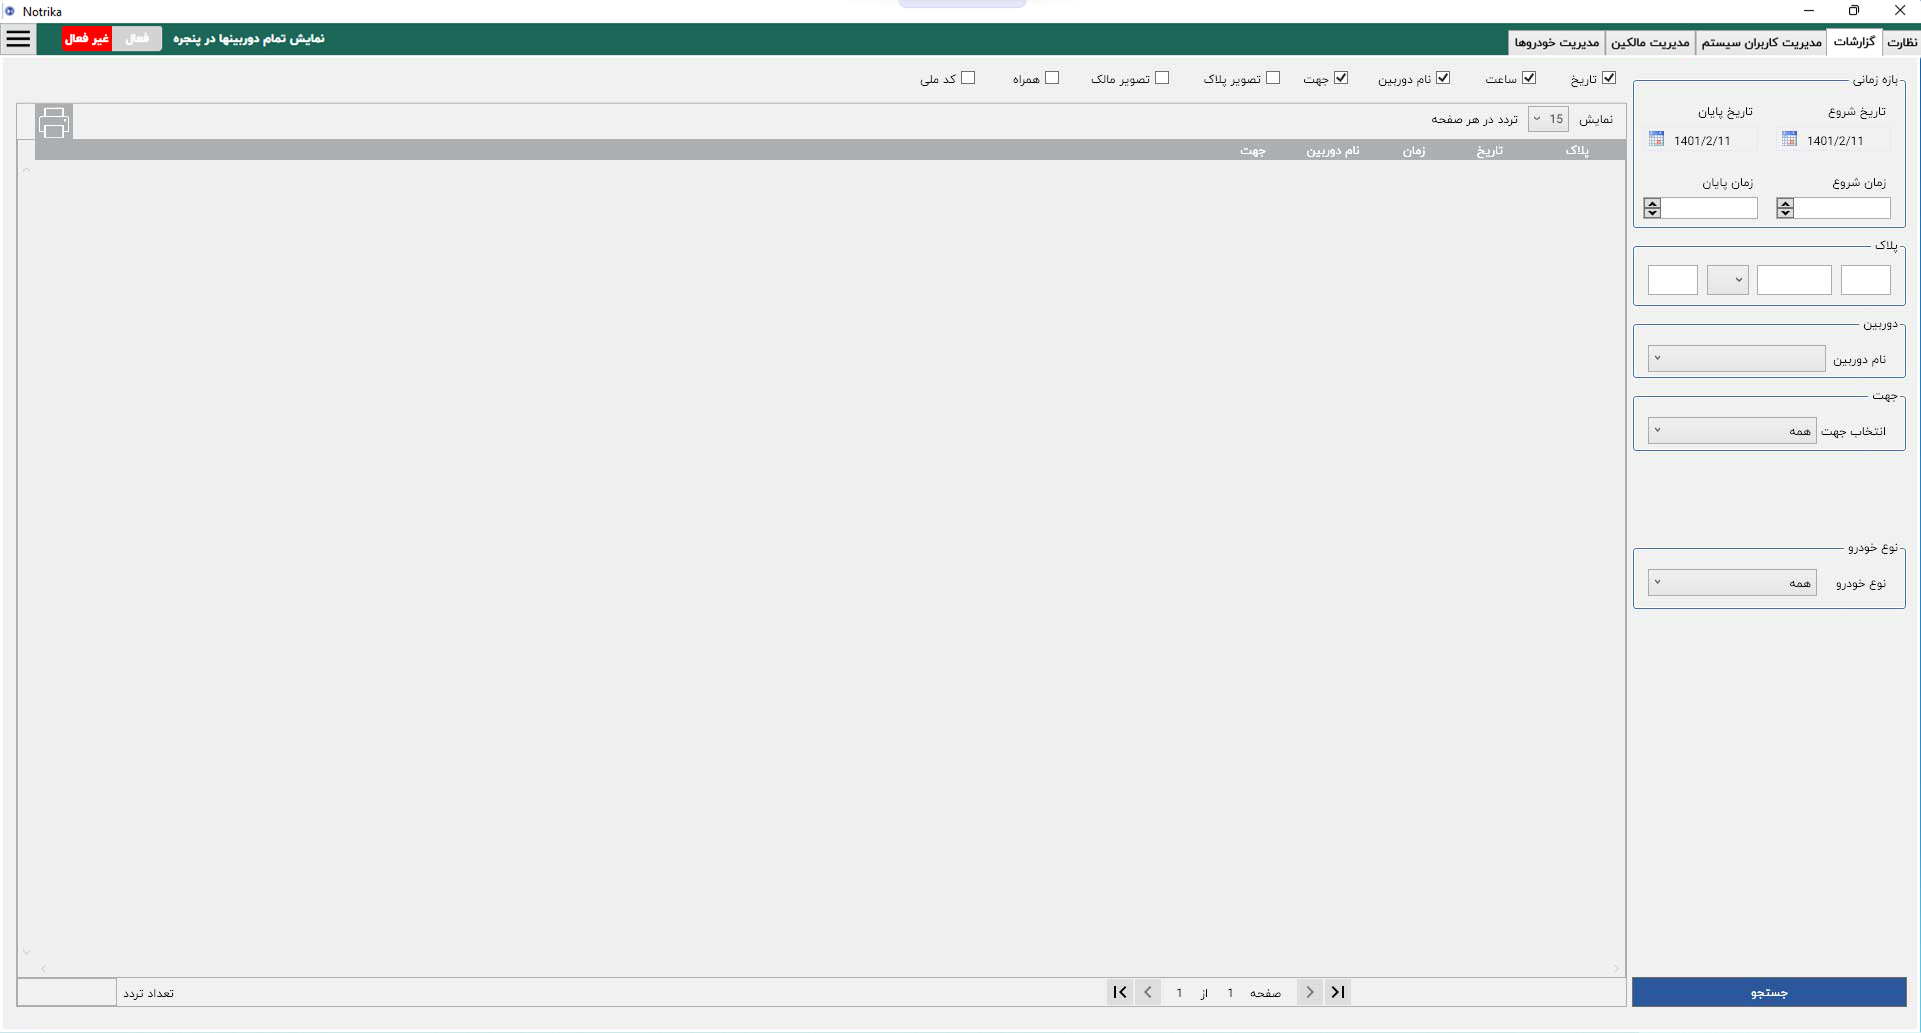
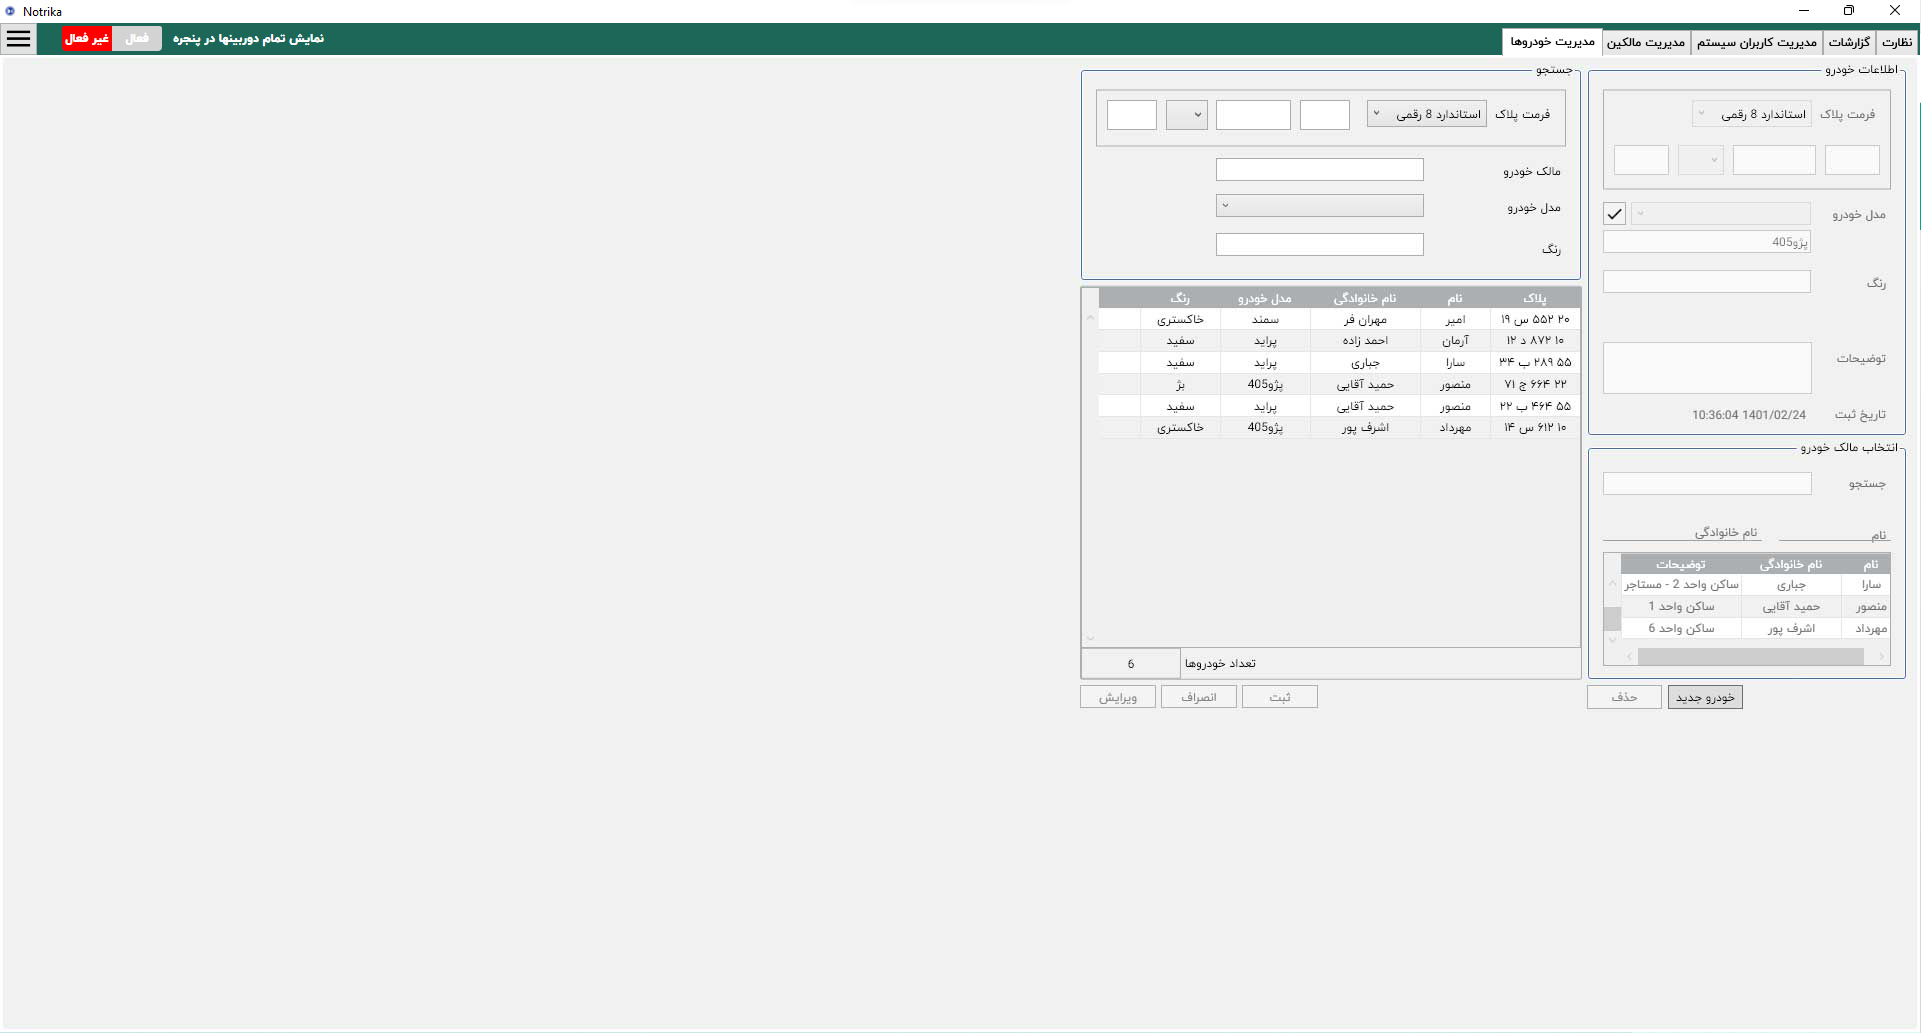
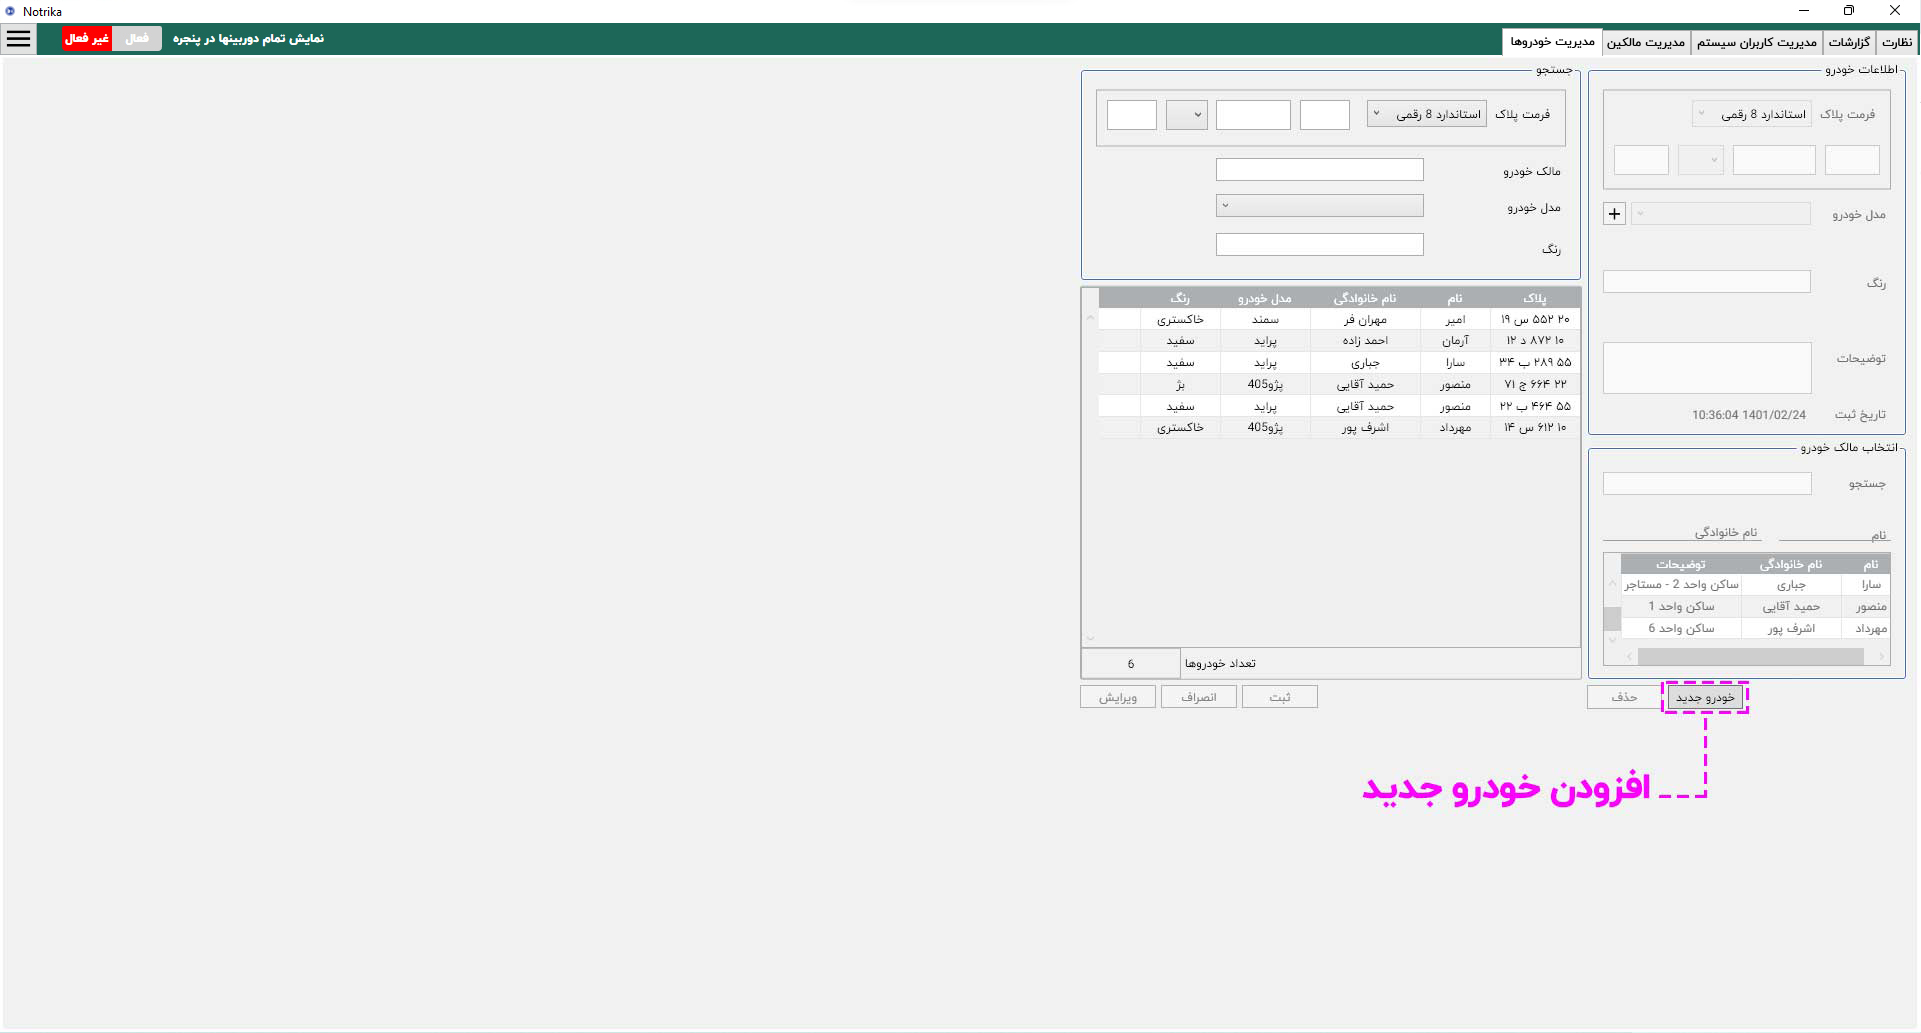
to enter the Add Camera & Video menu.

Now you need to enter the video information you want in the order shown.

  1. Camera/video name (this is an arbitrary name and is only used as camera or video identification)
  2. Full address of video file with extension

Once you have completed the required sections, click the Save button. Pressing this button will return to the Monitor tab of the Notrika license plate homepage.

In the next menu, you will be provided with basic facilities for working with video or camera. The buttons available to you in order from right to left are as follows:

  1. By pressing this button you will connect to the camera or if you have given the video address to the software, the video will be played.
  2. This button will move you to the camera settings menu (to rename the camera and the connection string or video address). You can also access advanced settings from this menu.
  3. By pressing this option you can create a favorite area (ROI). This area specifies the location you want for the license plate reading and the Plate outside the area are not detected.
  4. This option shows image information and Plate readings.

Click to play دکمه شروع به پلاک خوانی 
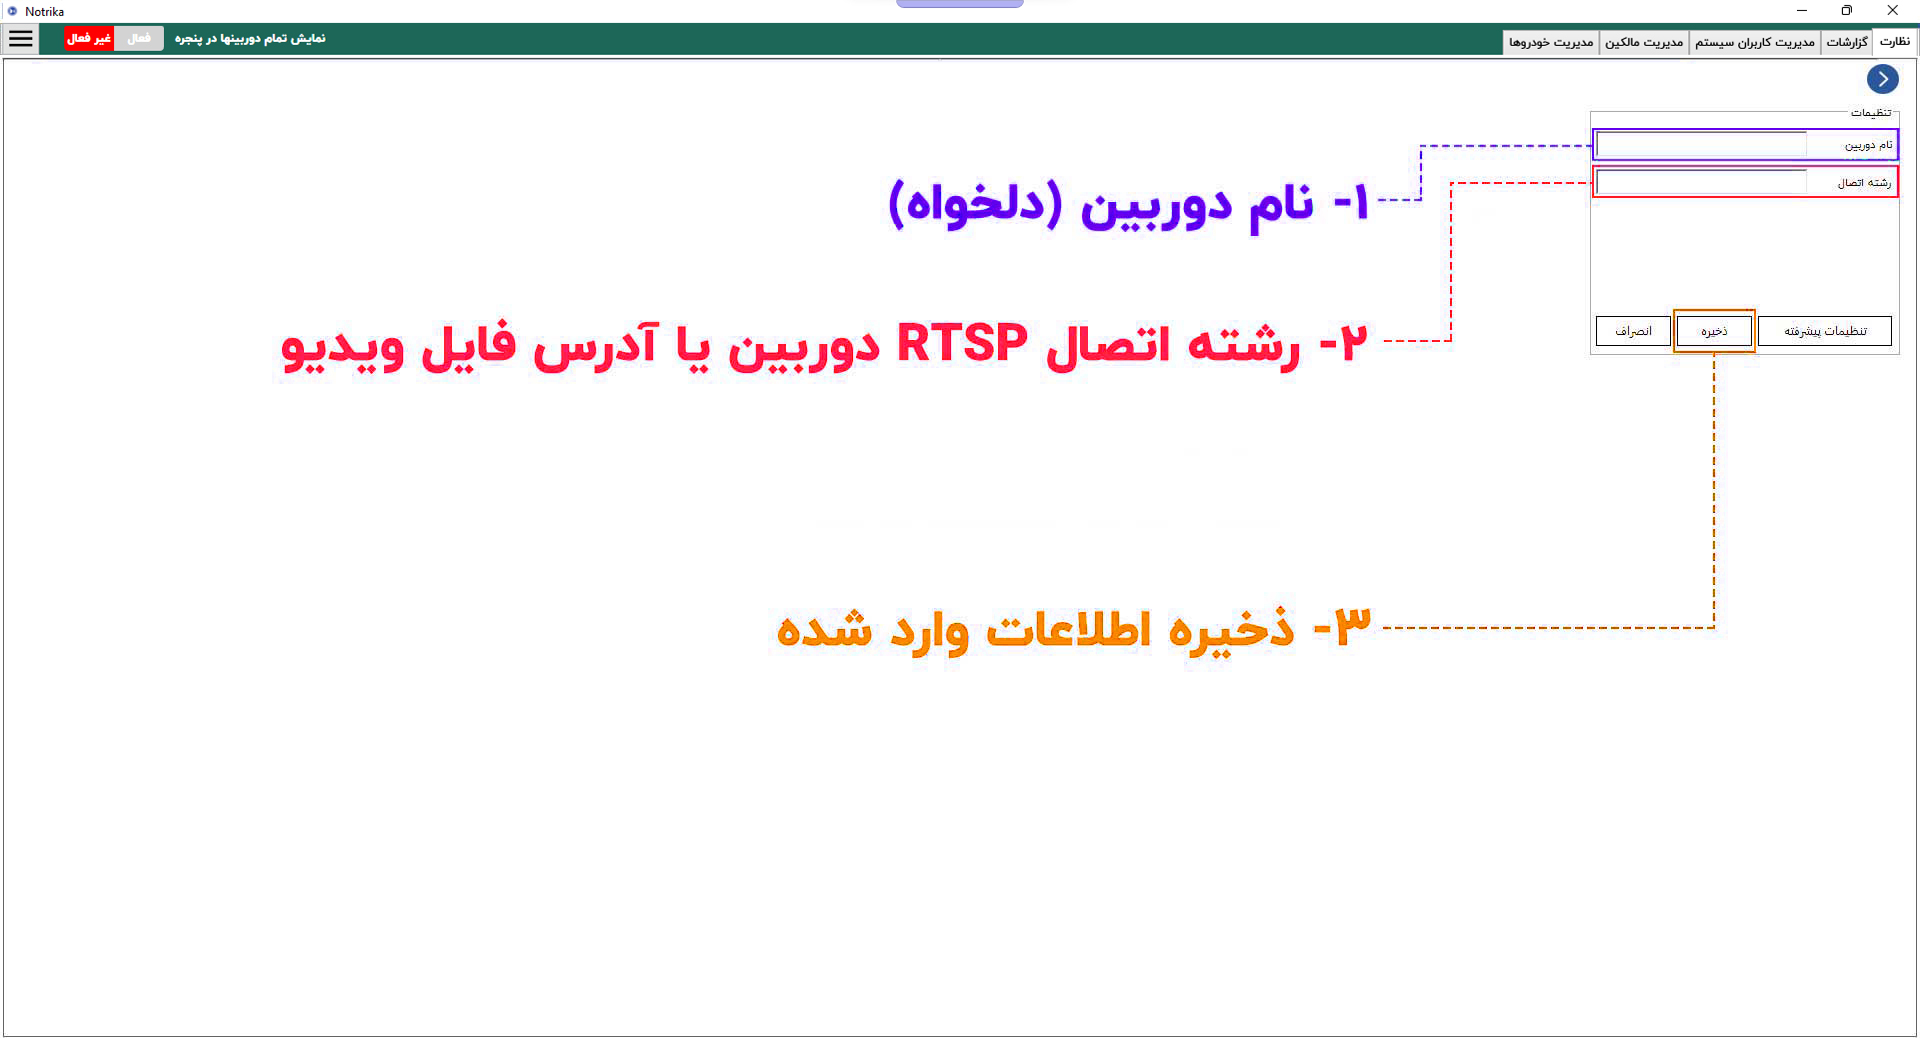
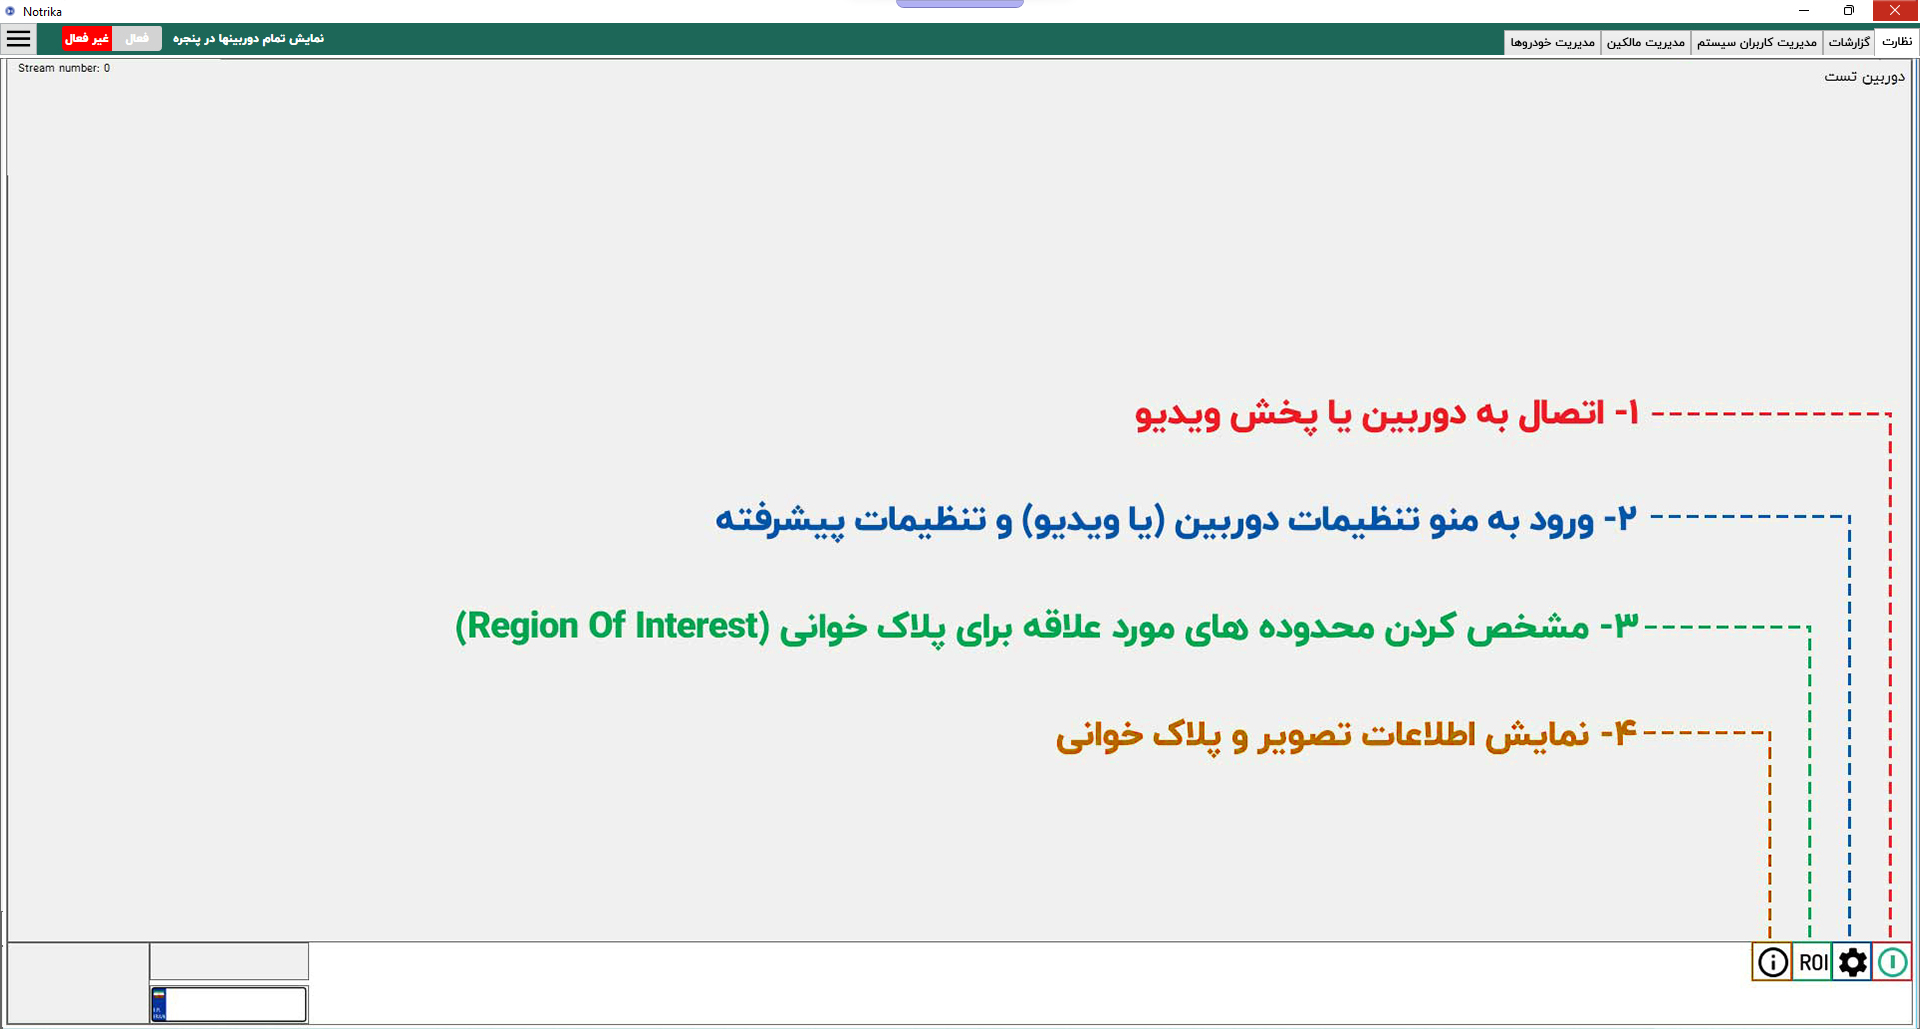
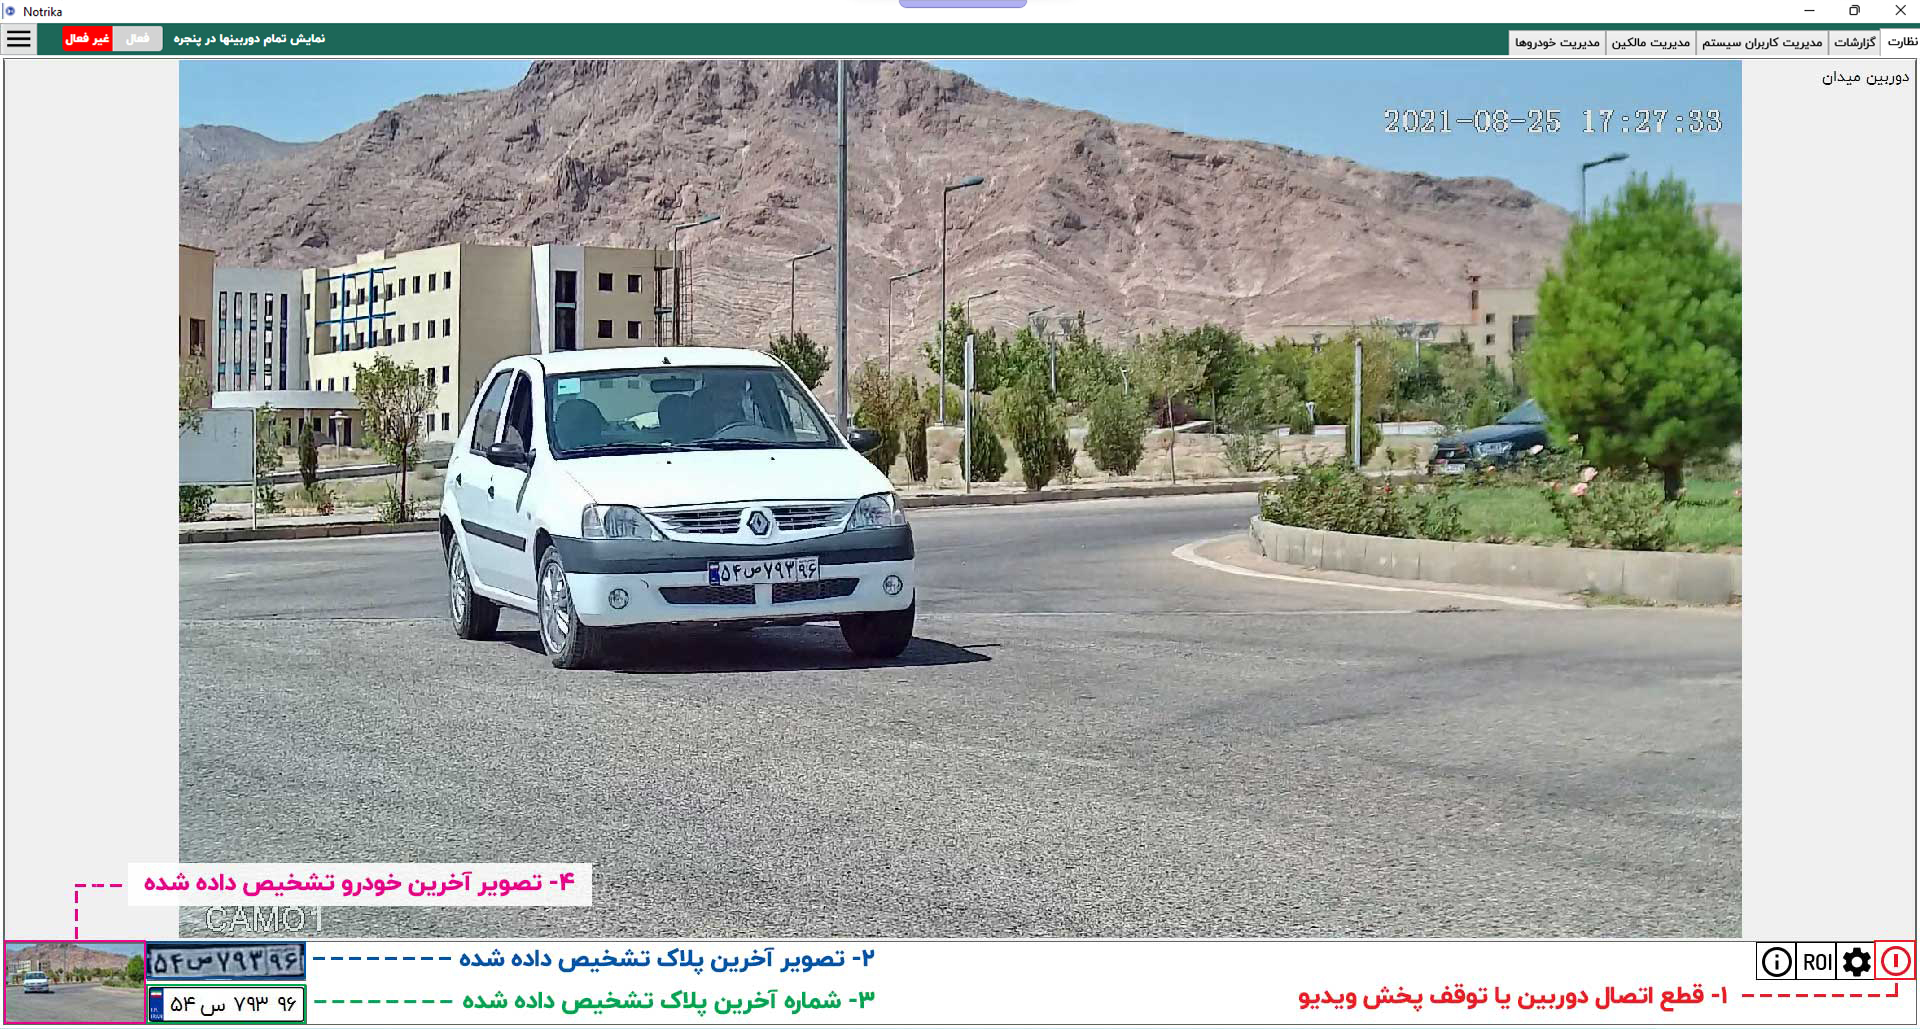
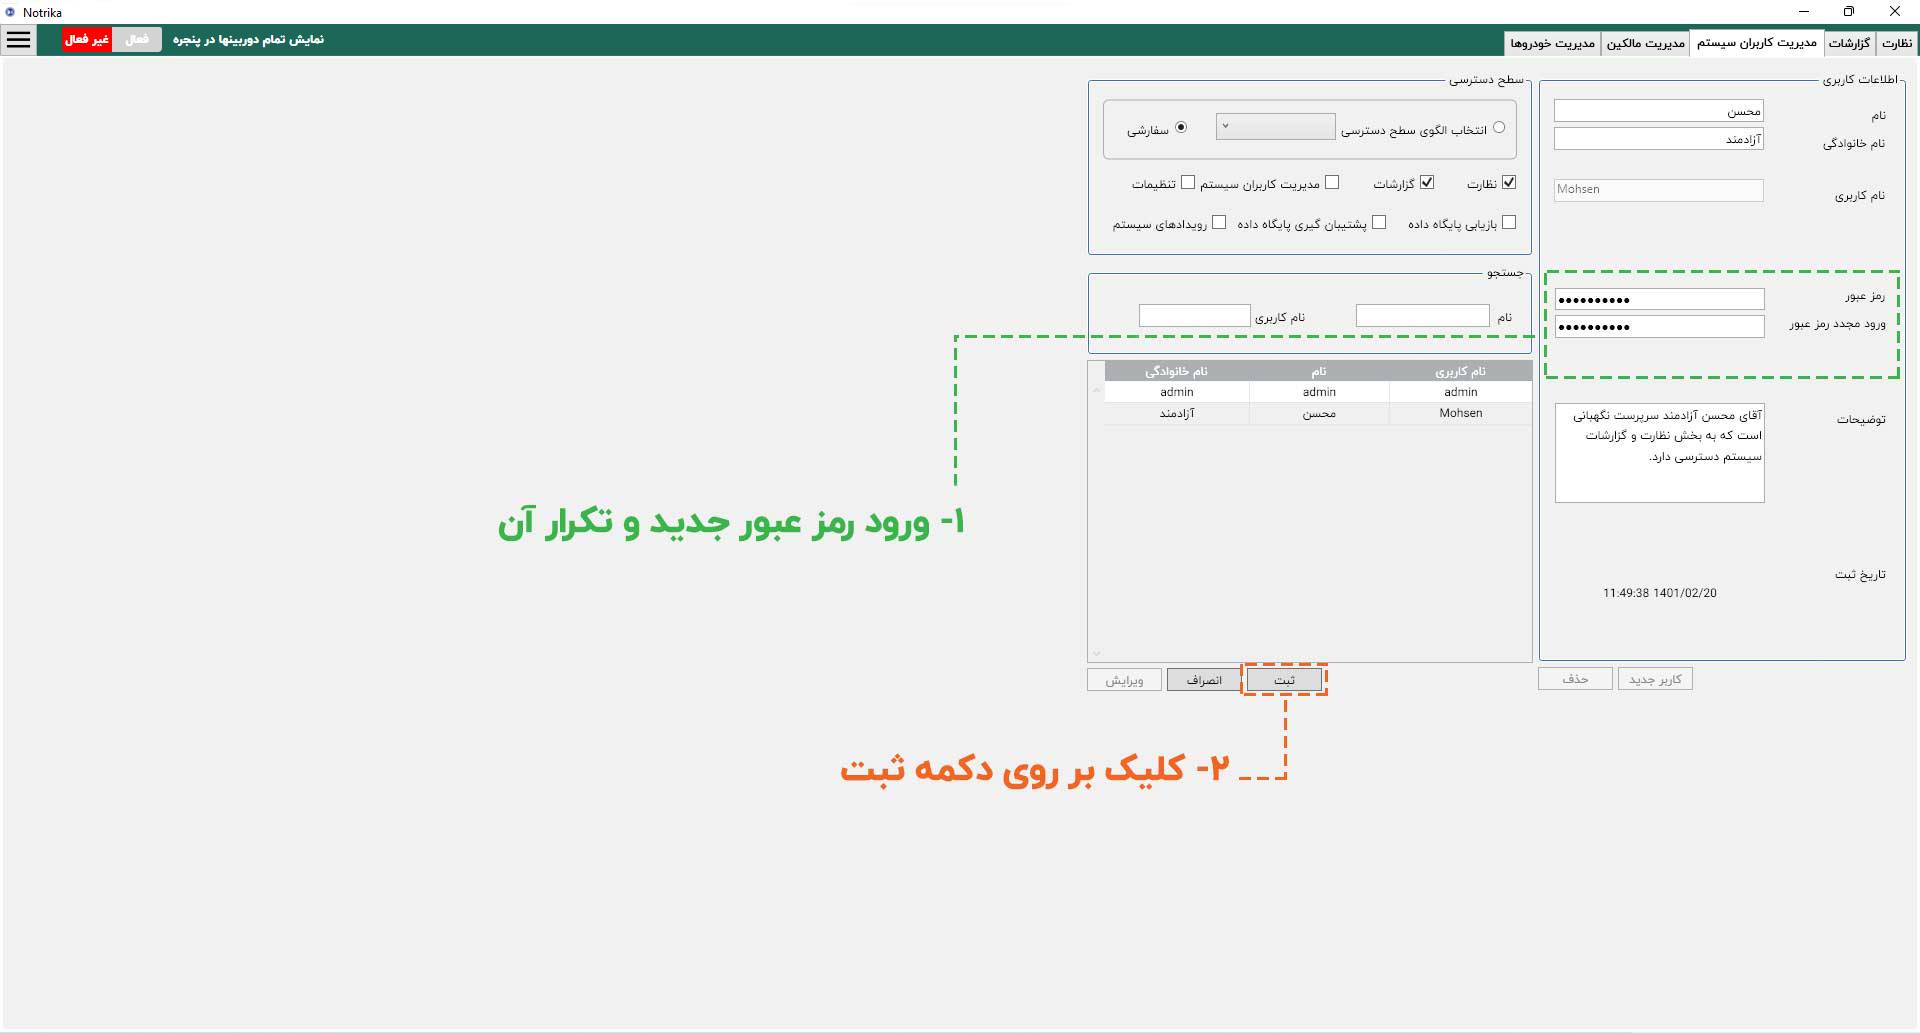
the video and start the button processing

Pressing this button will play your video and the Plate is automatically performed on the video.

Different sections available are:

  1. Through this button you can disconnect the camera or stop playing the video.
  2. Plate image of the last car detected in the image.
  3. The Plate number of the last car detected in the image detected by image processing and artificial intelligence.
  4. Image of the last car detected in the image.


Tips

Keep in mind that in the Noterica Plate Software monitoring tab, only the image and number of the last identified car are displayed. You should refer to the report tab to view other registered traffic.

License Plate Detection by Camera

To set up camera-based license plate reading, use the Add Video and Camera Icon button to enter the Add Camera menu. Alternatively, if you have previously added cameras to your software, use the Camera and Video Settings Icon 
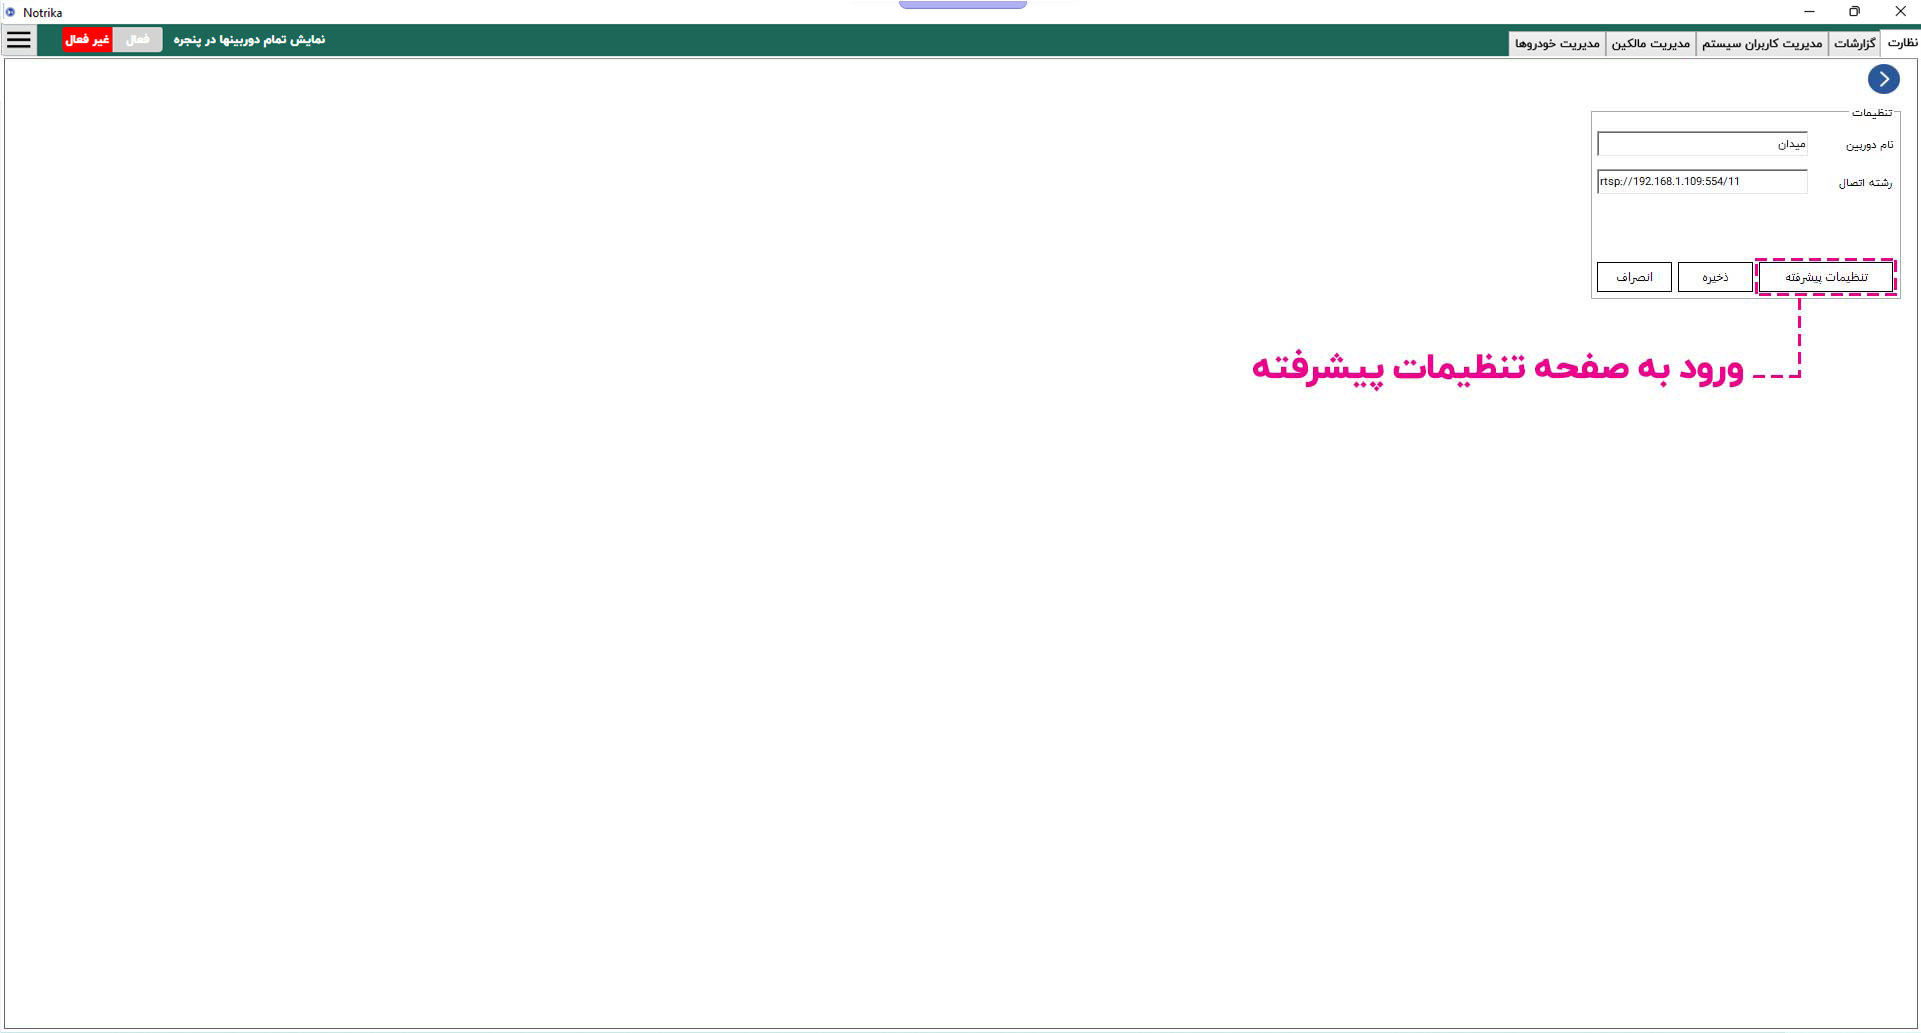
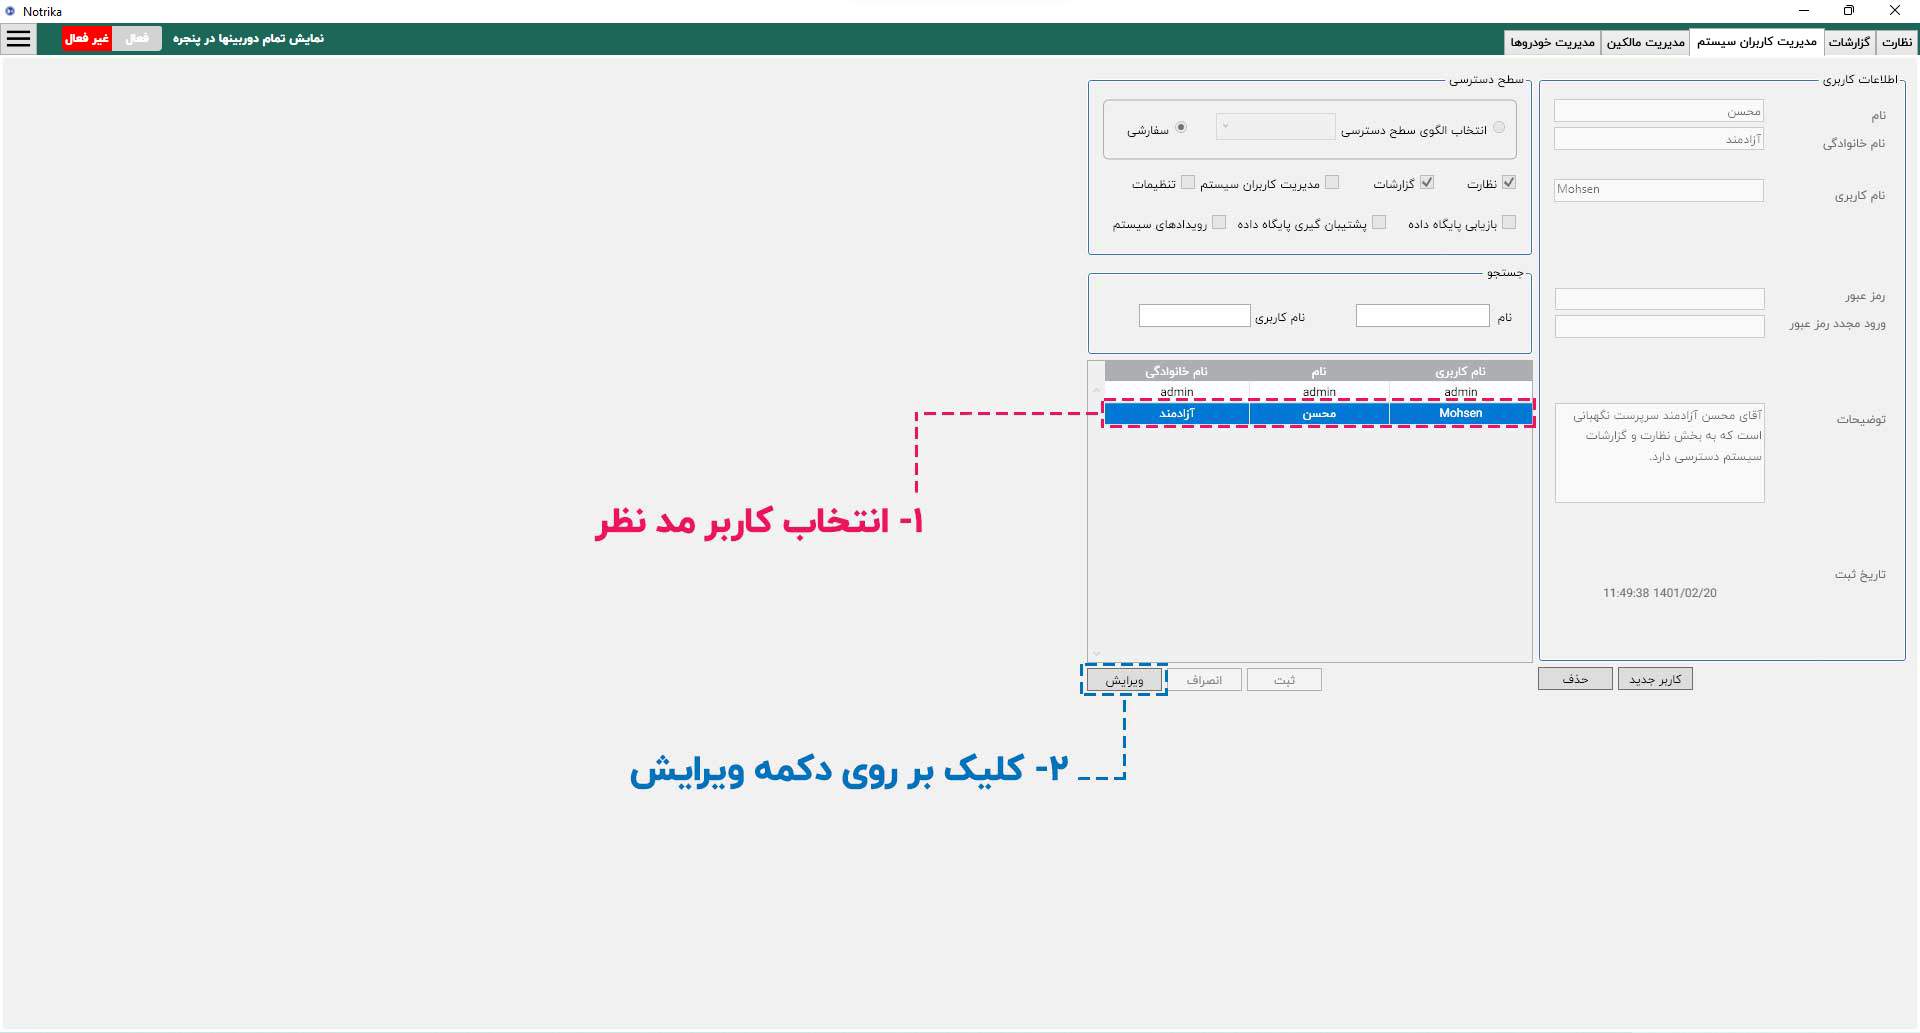
button to enter the Camera Settings menu.

As shown above, enter the required information on this page. This information is:

  1. Camera/Video Name (This is the desired name and is used only as a camera or video identification
  2. RTSP Camera Connection String

Once you have completed the required sections, click the Save button. Pressing this button will return to the Monitor tab of the Notrika license plate homepage.


Alert

Note that the RTSP connection string is different from the camera's IP. The following is explained about the connection string and how to find it.

Now, click the Camera and Video Settings Icon button to connect the software with the camera.

At this point the license plate reads automatically.

Different sections available are:

  1. Through this button you can disconnect the camera or stop playing the video.
  2. Plate image of the last car detected in the image.
  3. The Plate number of the last car detected in the image detected by image processing and artificial intelligence.
  4. Image of the last car detected in the image.


Tips

Keep in mind that in the Noterica Plate Software monitoring tab, only the image and number of the last identified car are displayed. You should refer to the report tab to view other registered traffic.


Alert

You might encounter the error message “Camera not found. Check the connection string again.” when trying to connect to the camera. If you see this error, first ensure your connection string is correct. If you still encounter this error message despite the connection string being correct, this issue might be due to the Audio Playback option.

Depending on your camera model, the connection may also be sent in addition to the camera's video, which can also be disrupted in connecting the software to the camera. To fix this problem after entering the camera connection string, enter the advanced settings section.

Enter this page, from the video parameters section, disable the sound player in the audio that was enabled, or activate it if it is disabled.

Once done, return to the camera monitoring page and click the connection button. If the connection problem occurs due to the sound, the problem will be resolved and the camera connection is done without error.

Working with a network camera

If you want to get the image directly from the IP Camera, you need to know the camera connection string. Each camera has a special connection string that is different from other cameras. There are several ways to get a camera connection string.

Working with a webcam camera

For a webcam, simply enter 0 (camera number) in the connection string field. After saving, click the Camera and Video Settings Icon button. If you have more than one camera, use numbers 1, 2, and so on.

advanced divider

Search and report

The Noterica license plate Reader and Traffic Management Software gives you a variety of complete features for searching and reporting in the report. Here are some reporting and search modes.

Reporting on the basis of date

To report on the software registered in the date, specify the start and end of your desired date from the timeframe in the right part of the report. Then, by pressing the search button, all the traffic will be displayed in this interval.

As you can see, the results of traffic are displayed by determining the reporting interval and pressing the search button. There are currently 2 results on this screen.

At the bottom left of the report page, the total number of traffic is specified in the search results. The Noterica license plate software shows the last 4 traffic. But if the number of traffic is more than 5, you can increase the number of results displayed or review the results pages.

Reporting based on time

To report the software registered in the software based on time (hours and minutes), specify the start and finish of the report from the time to the right part of the report. Then, by pressing the search button, all the traffic will be displayed in this interval.

As you can see, the results of traffic are displayed by determining the reporting interval and pressing the search button.

Search license plate number

The Noterica license plate software allows you to have a detailed search for the license plate.

جستجو پلاک

As you can see in the field provided to search the license plate you can search each part of the license plate number by separately

For example, we search for the letter ق and the last two digits 32.

After entering the desired sections and clicking the search button, traffic will be displayed according to the entered parameters.

Combined reporting

You can use all filters together to search and report on the registered traffic in the Noterica license plate Reader software.

For example, we want to find a cars movements within the time range from 1:00 PM on 1401/2/8 to 5:30 PM on 1401/2/11. Furthermore, we know the first two digits of the license plate are 25 and its last two digits are 36. By entering these parameters and searching, we can view the desired car's movements recorded within this time range.

By completing the sections based on the parameters and clicking the search button, all the traffic that matches the entered specifications will be listed.

Information displayed in reports

In the Noterica license plate Software Reporting section you can see information such as date and time, camera name, car movement, license plate image, and more. These options can be selected from the top of the list of reports to display in the information provided in each traffic.

For example, we enable the License Plate Image checkbox so that car license plate images are also displayed in the reports.

This will also be added to the report of the plates and will be displayed at the output of the reports.


Tips

If you have selected the Save License Plate and Car Image option in the image storage settings, clicking on the license plate image in the reports list will display the saved image of the corresponding car in a new window.


Tips

The information available in the reporting section depends on the version of your software. If you are using the Notrika license plate Road version, some fields such as the owner image, the national code and the mobile number will not be displayed.

Output from reports

The Noterica license plate software allows you to get out of the reports in the format of the PDF, Excel, as well as printing the reports.

By pressing this button, you will enter the report print page.

In this window, you'll see a preview of the traffic report list. To export it, click the Export Reports Icon button and select one of the formats like Excel, PDF, or Word. To print the reports, click the Print Reports Icon button.

advanced divider

Manage users

In the Noterica Plate Software Management tab you can manage the system users and specify the amount of access to the software.

Change Admin User Information

For convenient software use, the admin user in Notrika Pelak software, who is designated as the default user with full access, logs in using the username admin and password admin.


Alert

Because of security issues, it is recommended that you edit the user login information after the initial login to the software.

To change the admin user information, first select the admin user from the user list, then click the Edit button.

To change the admin user information, first select the admin user from the user list, then click the Edit button.

You can First Name , Last Name and Password change the user. You can also enter Description for each user in the system to see these descriptions if you go to the user and search the user.

Clicking the registration button will apply changes.


Alert

Notrika Pelak software also provides the ability to change user access levels. However, because the admin user is the system's Main Administrator, be careful not to change the admin user's access level until you have defined another user as the Main Administrator in the system.

Add new user

To add a new user on the system, click the new user button from the system user management section.

By pressing the new user button, you will open the fields of logging in user information. You can add the new user to the system by filling the user information in these fields.

By default, Notrika Pelak software offers two access levels: Main Administrator and Normal User.

  • Main Administrator : This user has access to all sections of the software, including monitoring, reports, system user management, settings, and so forth.

  • Normal User: This user only has access to the software's monitoring section.

Additionally, you can apply custom access permissions for the new user by selecting the Custom option.

By filling in the user information and clicking the save button, the new user will be added to the list.

As you can see, the new user has been added to the list.

Now, log into the software using the new user's credentials.

After entering the user information, click the login button.

As can be seen, the new user has only two sections of monitoring and reports that are in accordance with the defined access to the user.

Change user password

To change the user password, first select the user from the user list and then click the Edit button.

By pressing the editing button, the user information sections are opened and you can change the information.

To change the user's password, enter your desired password in the Password and Confirm Password fields, then click the save button.

If the two entered passwords match, you will see the following confirmation window.

Now the user can log in to Notrika Pelak software with their new password.


Tips

A system user who wishes to change their password might not have access to the System User Management section. In such a case, the user can change their password using a simpler method. To do this, click the iPelak Hamburger Menu 
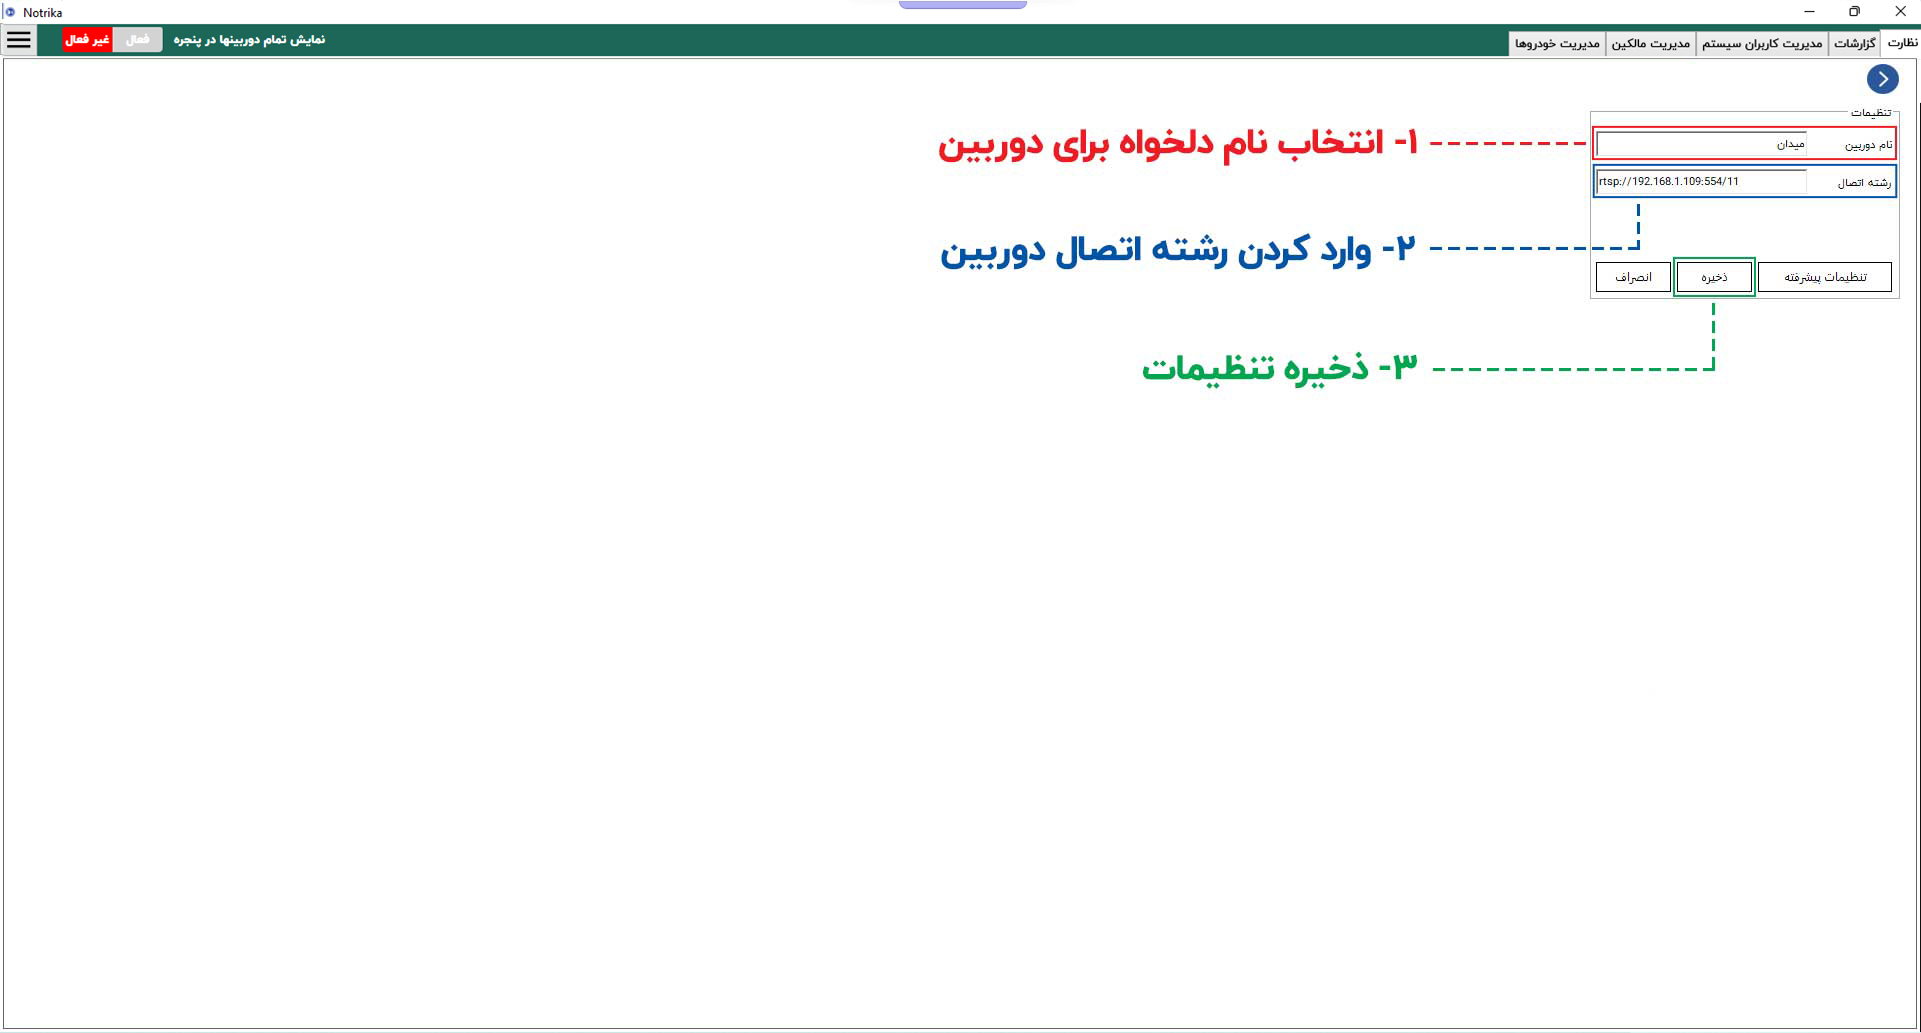
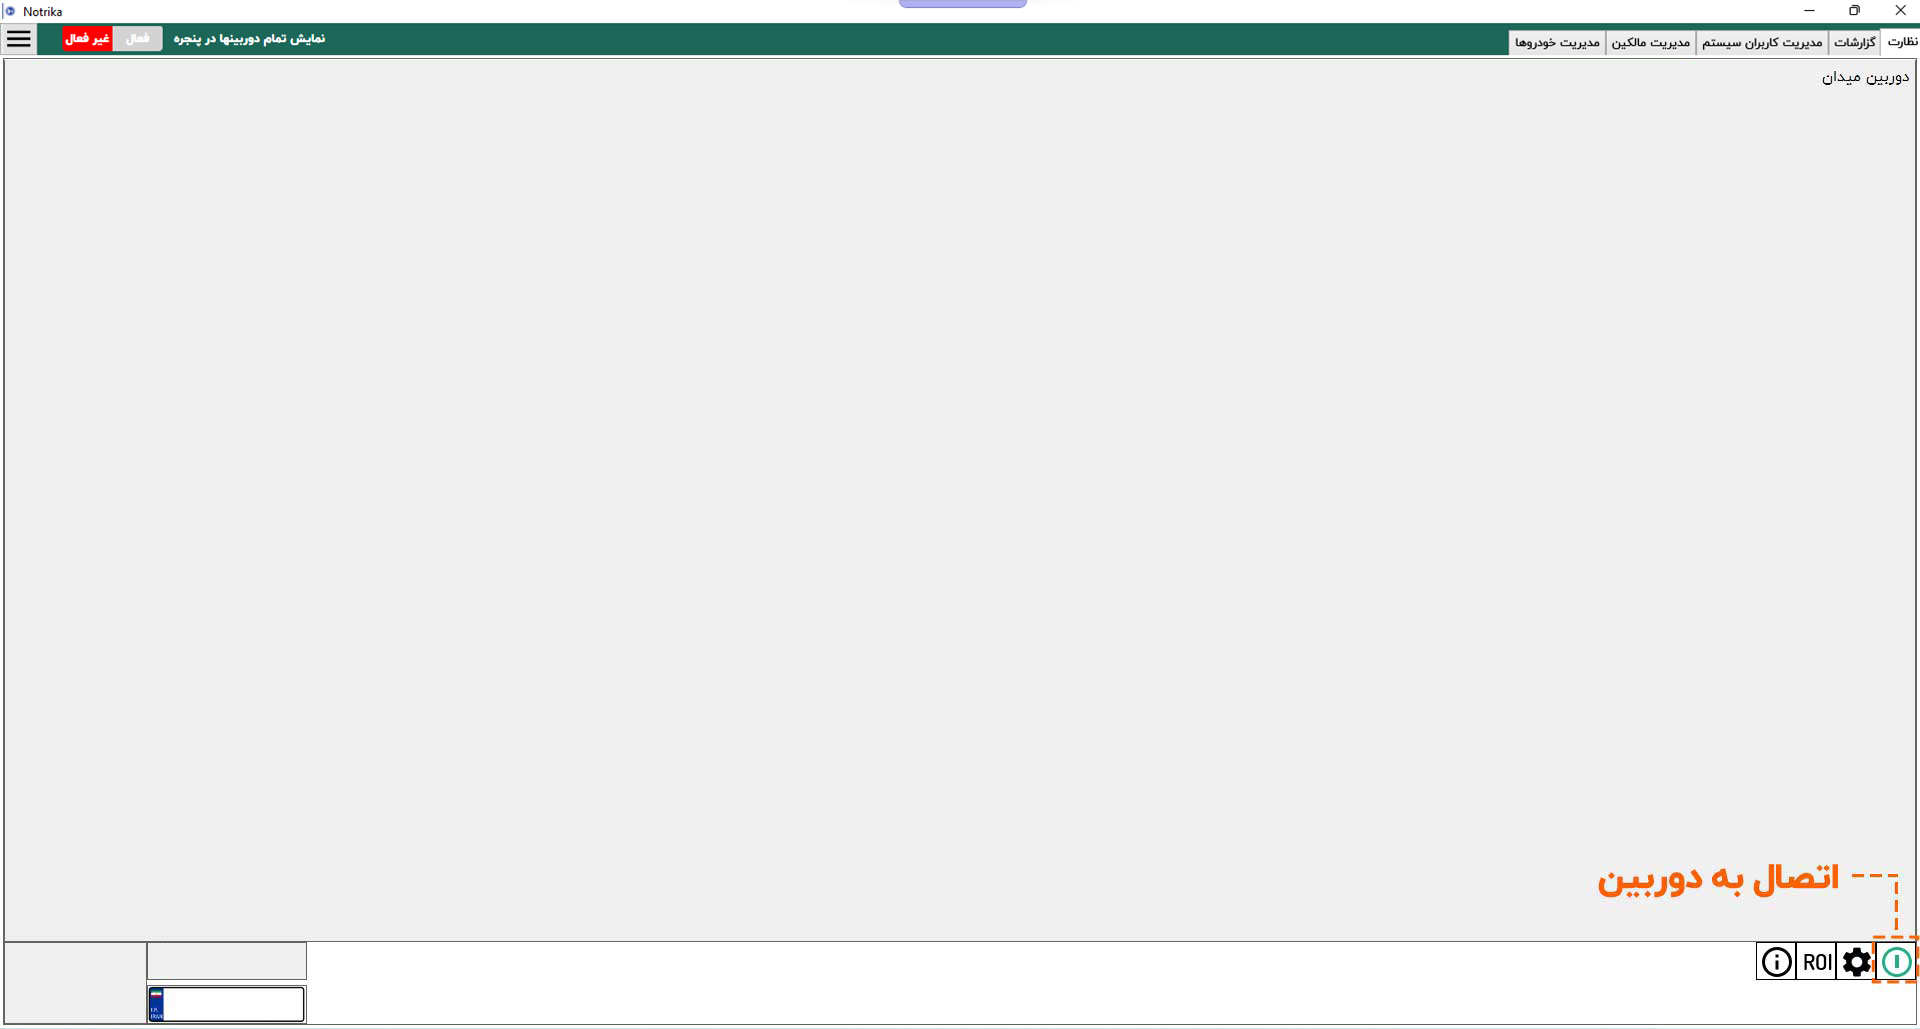
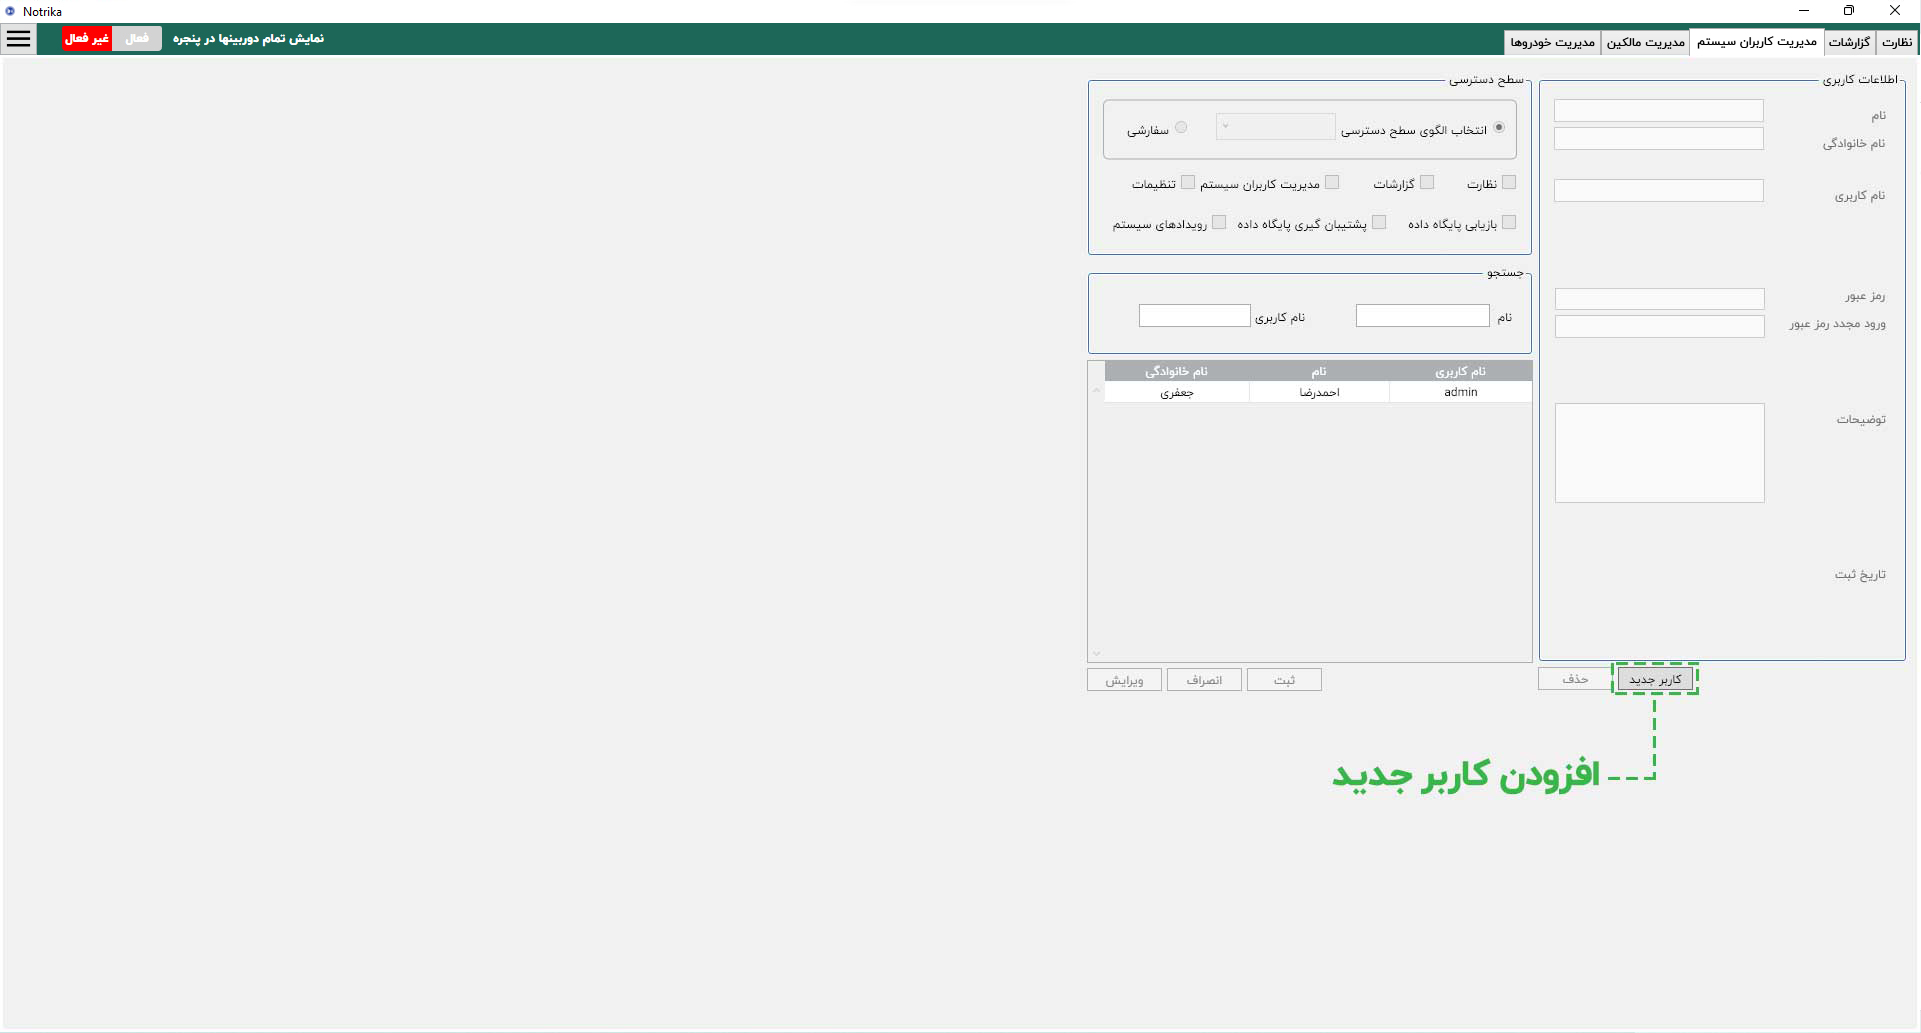
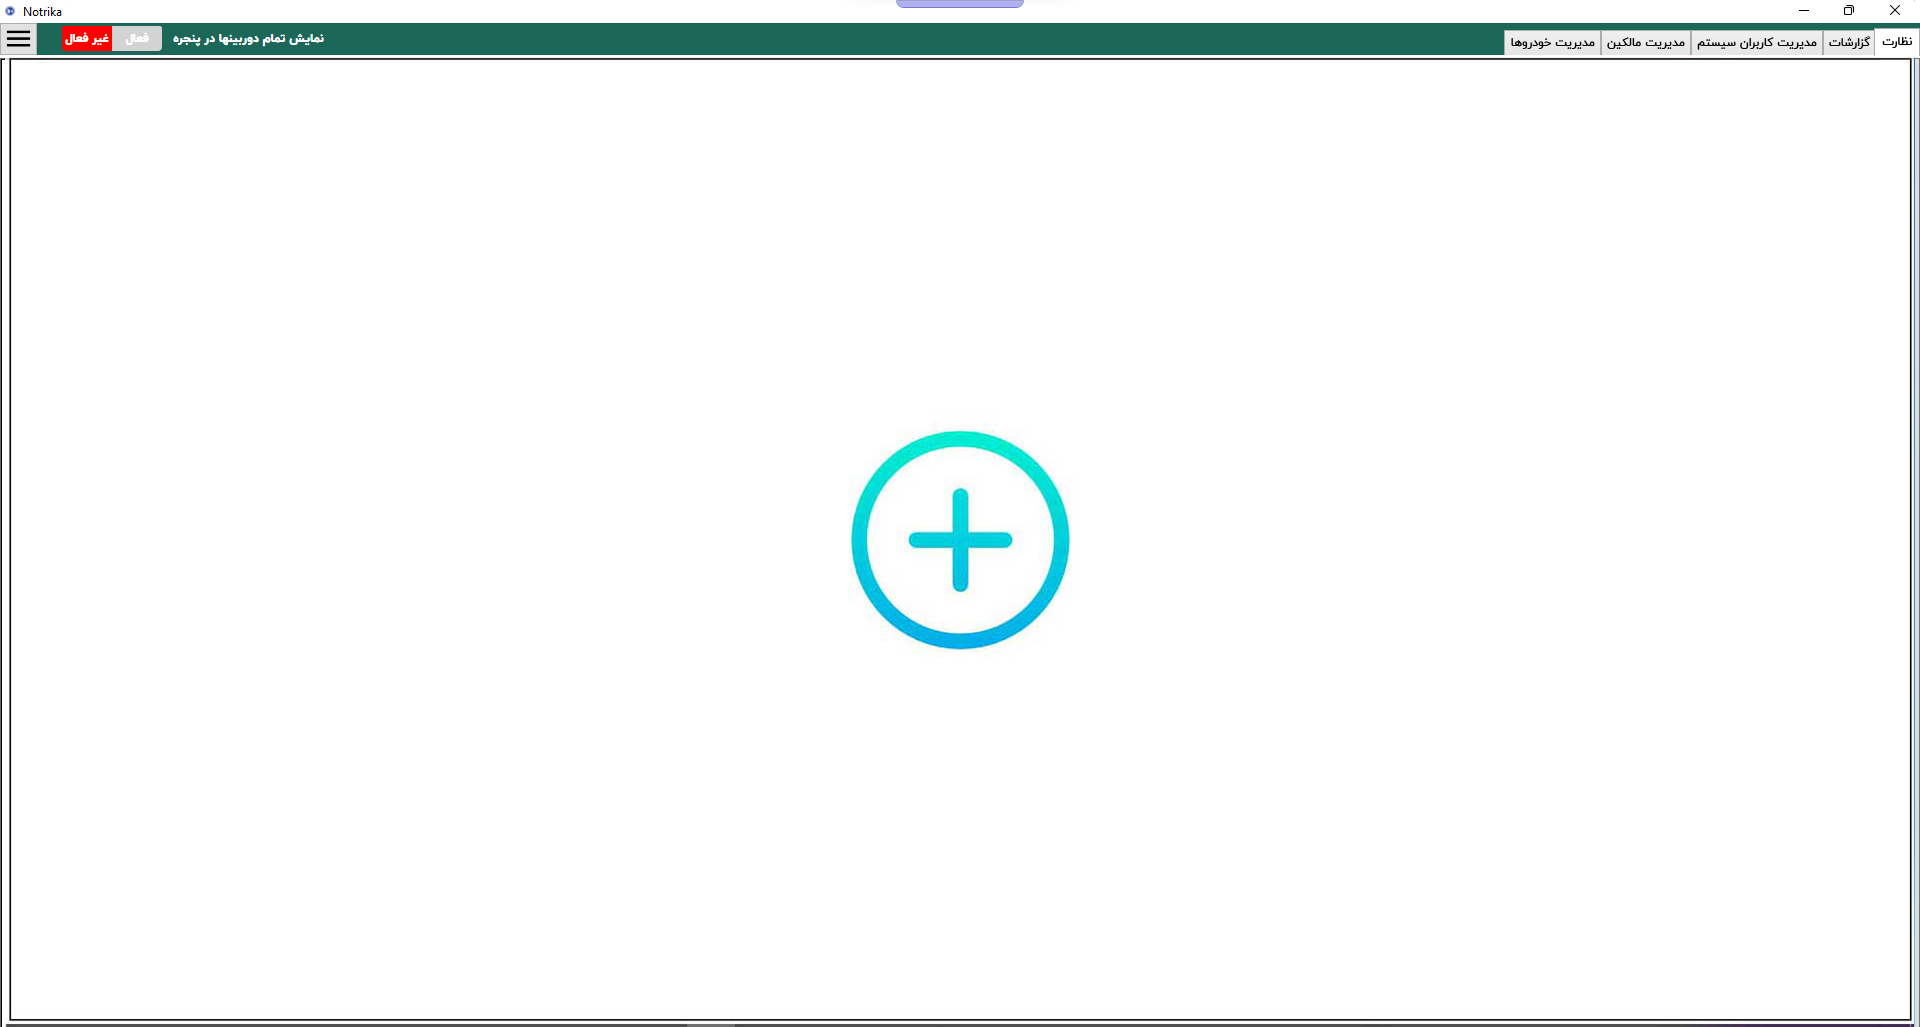
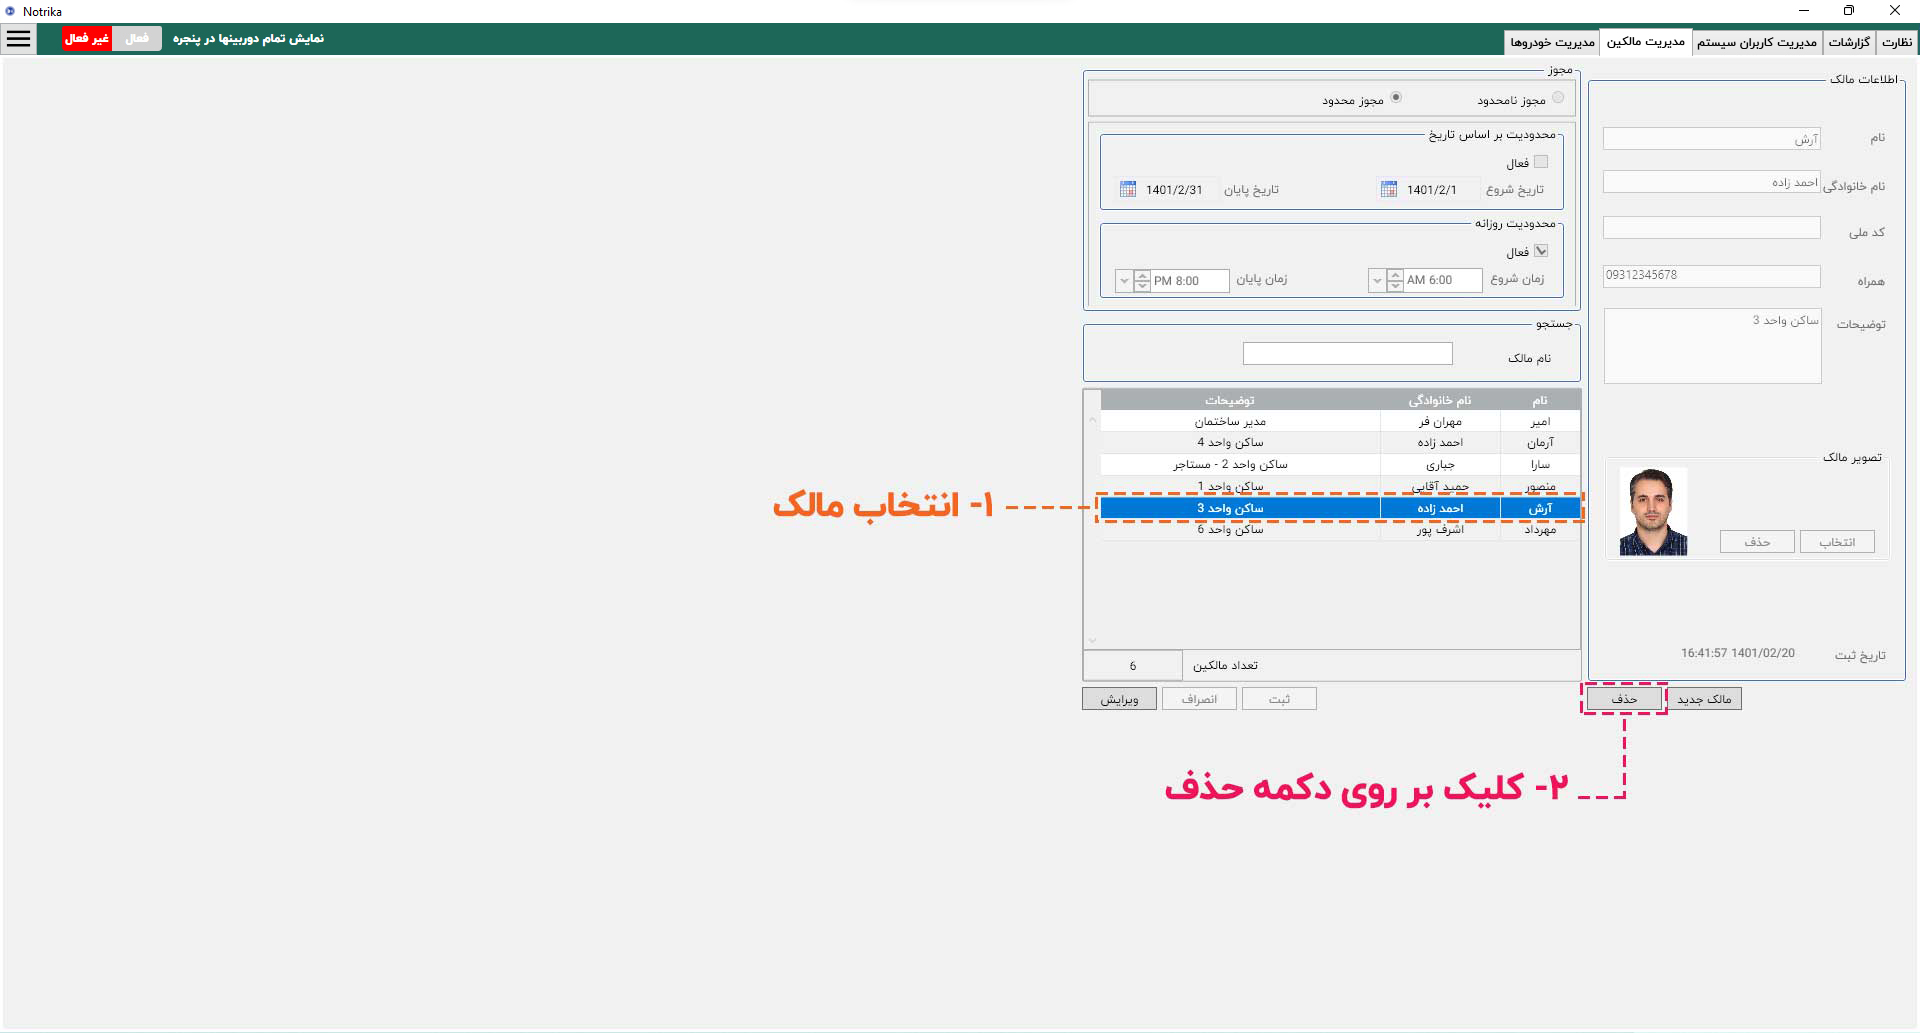
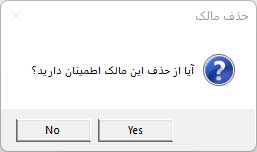
button in the top-left corner of the software.
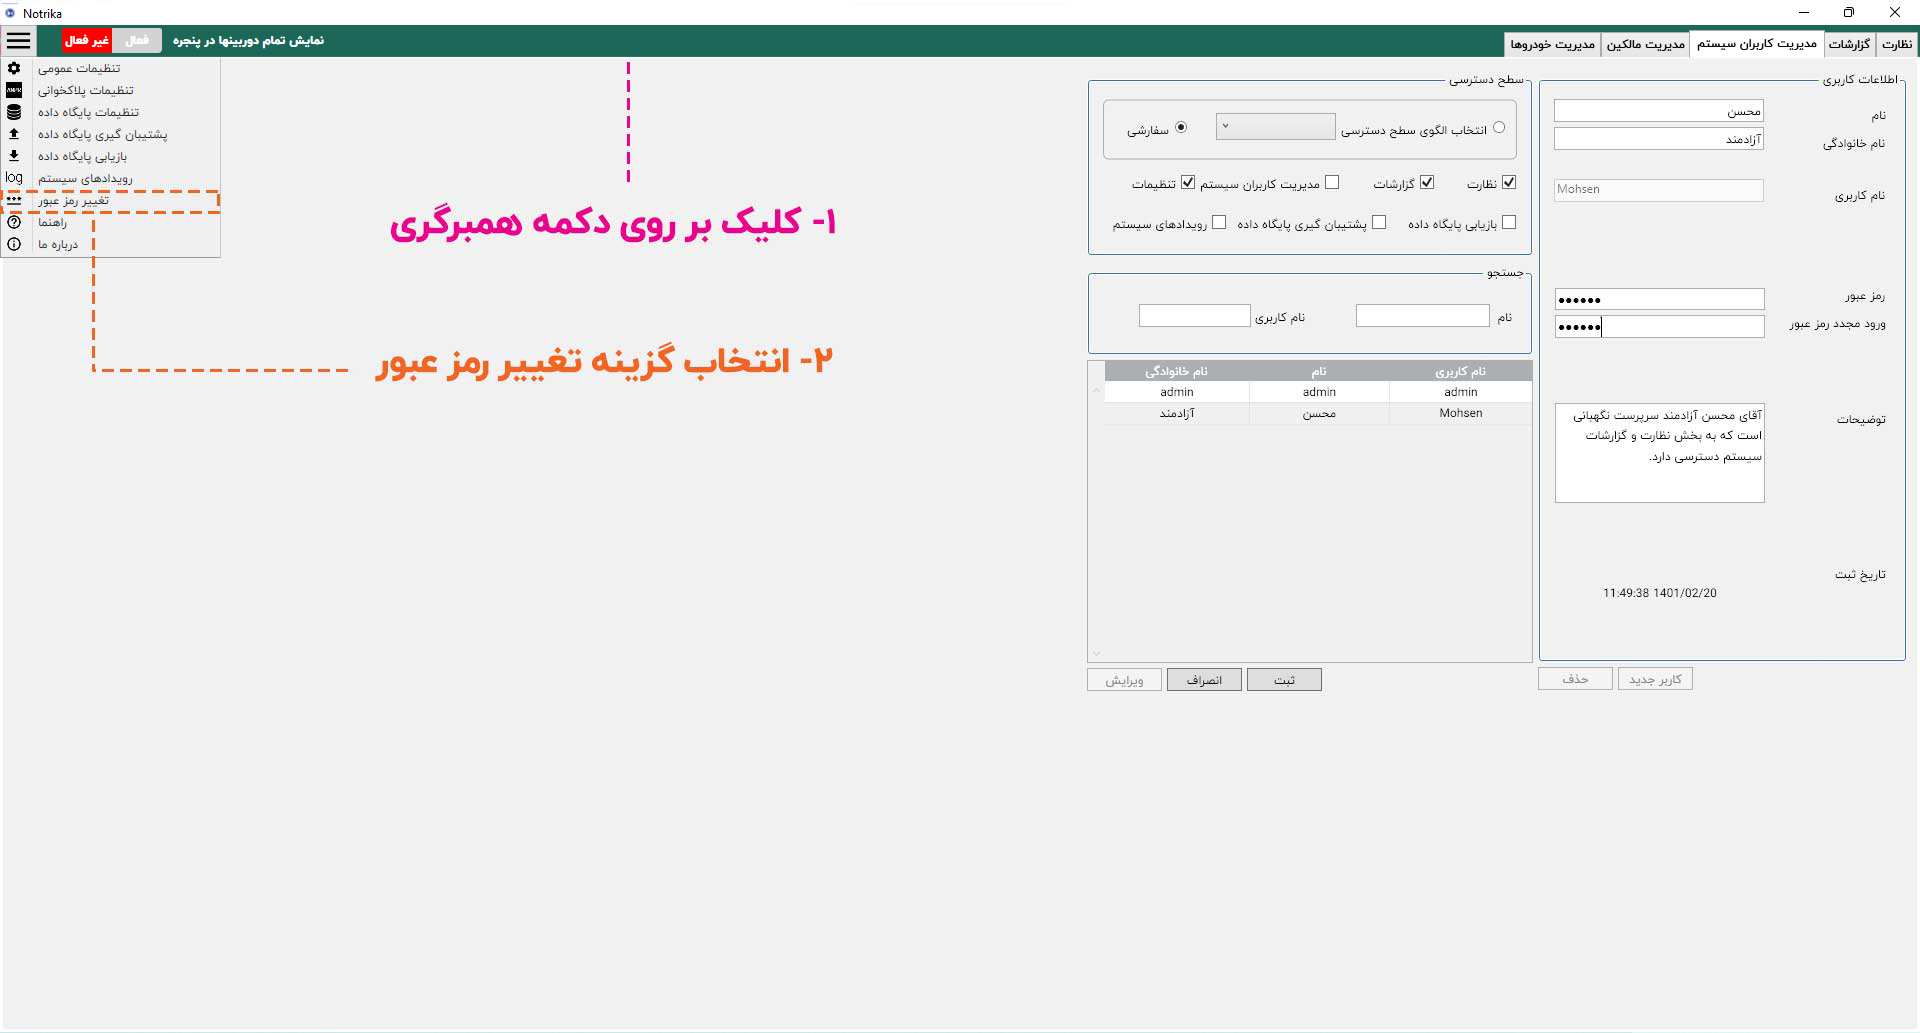
Clicking this option will open the password change window. In this window, you can change your password by entering your Current Password, New Password, and Confirm Password.

After filling in the mentioned sections, clicking the change password button will apply the changes.

Change user access level

To change the user's access level, first select the desired user from the user list, then click the edit button.

By pressing the editing button, the user information sections are opened and you can change the information.

Now you can change the user access level.


Alert

For security reasons, to make any changes to user information, the user's Password and Confirm Password must be re-entered. You can either enter the user's previous password or define a new one for them.

Upon clicking Register, you will see a confirmation message for the changes.

Now, if the user logs into the system, they will receive a new access level.

Delete user

To delete a user, first click on the user name in the user list, then click the delete user button.

Clicking the Delete button displays a message for confirming the deletion of the user.

By clicking Yes, the user will be deleted from the system.

advanced divider

Owner Management

In the car owner management section of the Notrika Plate Reader and Traffic Management software, you can register car owners in the software and define a travel permit for each one.


Tips

In Notrika Pelak software, a travel permit is defined for owners, and every car associated with the owner uses the owner's travel permit.

Define new owner

To define a new owner to the system, first enter the owner management section, then click on the new owner button.

Clicking on the "New Owner" button will open different sections in the software for entering owner information. In this section, you must enter the owner's details.

The sections required for registering a new owner are:

  • First Name (Required)
  • Last Name (Required)
  • National ID: The owner's National ID must be entered in the correct format. (Optional)
  • Contact Number: In this section, you can enter the owner's mobile or landline number. The number format must be correct. (Optional)
  • Description: These details are for more accurate owner identification. (Optional)
  • Owner's Image: This image is for better owner identification and can be displayed in traffic reports. (Optional)
  • License: Information about the license will be explained in the next section.

After entering the information, clicking the "Register New Owner" button adds it to the system.

Edit Owner

To edit the registered owner in the system, first select the desired owner from the list of owners and click the edit button.

Clicking the edit button opens the sections related to owner information, where you can edit them.

After editing the information, click the Save button. Changes are saved in the system by clicking the Save button.

Issuing the owner's traffic permit

Notrika Pelak software, as a specialized software in the field of traffic management, provides comprehensive facilities for issuing permits to car owners.

In Notrika Pelak software, you can issue separate traffic permits for each owner. When the respective owner's vehicle travels and its license plate is detected by Notrika Pelak, this permit is indicated in the monitoring section as authorized or unauthorized.

Also, if the automation features of Notrika Plak are used and the software is connected to the access control gate or boom barrier, the boom barrier or gate can be automatically and intelligently opened for the car to pass, if the car is authorized.

To change the owner's access permission, first select the desired owner and then click the edit button.

By clicking the edit button, different sections of the owner's specifications can be changed, and the section we are interested in here is the license.

The Notrika Pelak software generally offers 4 types of licenses to owners:

  • Unlimited License: cars belonging to this owner are authorized at any time of day or night, and on any date.
  • Date-Restricted License: cars belonging to this owner are only authorized to pass on the specified date. They'll be identified as unauthorized before the start date and after the end date.
  • Time-Restricted License (Daily Limit): cars belonging to this owner are restricted by time and are only authorized to pass within the time range between the start time and the end time.
  • Date and Time-Restricted License: As a combination of the second and third modes, in this case, cars are authorized to pass within the specified date range from the start date to the end date, and between the start time and the end time. They'll be identified as unauthorized on any date outside these two ranges.

For example, we want to issue a one-month license for a car owner, valid from 1401/2/1 to 1401/2/31. Due to the complex's night traffic restrictions, cars registered for this owner are allowed to pass only from 6:00 AM to 8:00 PM. This license will be issued as follows:

Upon clicking the register button, the specified permission for the owner is applied.

Delete owner

To delete the owner, simply select the desired owner from the list of owners and click the delete button.

Clicking the Delete button will display a confirmation message for deletion.

By confirming this message, the user will be removed from the list.

advanced divider

Cars Management

In the car management section, you can enter the license plate numbers, models, and colors of the cars into the system and assign them to registered owners.


Tips

In the Notrika license plate software, a travel permit is defined for owners, and any car associated with the owner uses the owner's travel permit. Each owner in the Notrika license plate software can have one or more cars, all of which derive their permit from the owner.

Defining a new Car

To register a new car in the system, first enter the car management section and then click on the new car button.

Clicking on the "New Car" button will open different sections in the software for entering car information. In this section, you must enter the car specifications and license plate number.

The sections required for registering a new car are:

  • Plate Format: The standard 8-digit format of the country's official license plate or other formats like motorcycle or free zone plates. (Required)
  • Car Plate Number (Required)
  • Car Model: Specify the car model from common options like Samand, Pride, and Peugeot 405, or select the "Miscellaneous" option. (Required)
  • Car Model Details: In this section, you can add more details about the car model. (Optional)
  • Color (Optional)
  • Description: In this section, you can enter more descriptions and information about the car. (Optional)
  • Select Owner: Select the desired car owner from the list of owners. (Required)

After entering the information, clicking the new car registration button will be added to the system.

Edit car specifications

To edit the car registered on the system, first select the car from the car's list and click the edit button.

Clicking on the edit button, the car information sections are opened and you can edit them.

After editing the information, click the Save button. Changes are saved in the system by clicking the Save button.

Removing the Car

To remove the car, simply select the car from the car list and click on the Remove button.

Clicking the Delete button will display a confirmation message for deletion.

By confirming this message, the car will be removed from the list.

advanced divider

Installation Terms

In order to perform a license plate reading properly and accurately guaranteed recognition, appropriate conditions must be provided. In case of deduction of any of the following conditions, the accuracy of the recognition will be reduced.

Camera selection

Use optimized cameras for license plate reading, the suitable supervisory cameras are not the license plate reading. Preferably use cameras sold by Iran Nothika, otherwise be sure to consult with Iran Notrika's specialists.

Launching the camera

It is important to set up a camera under proper conditions. Consider the following parameters when launching the camera:
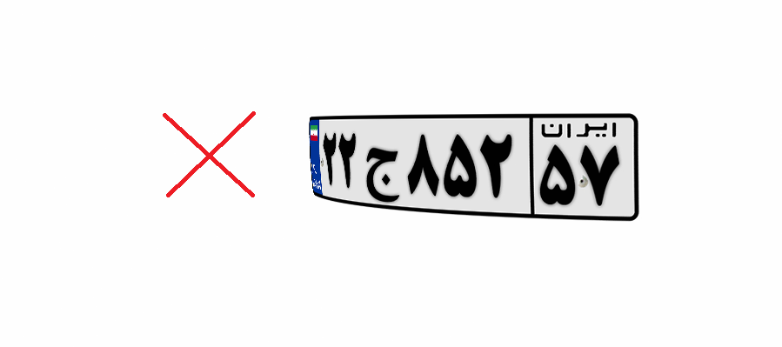
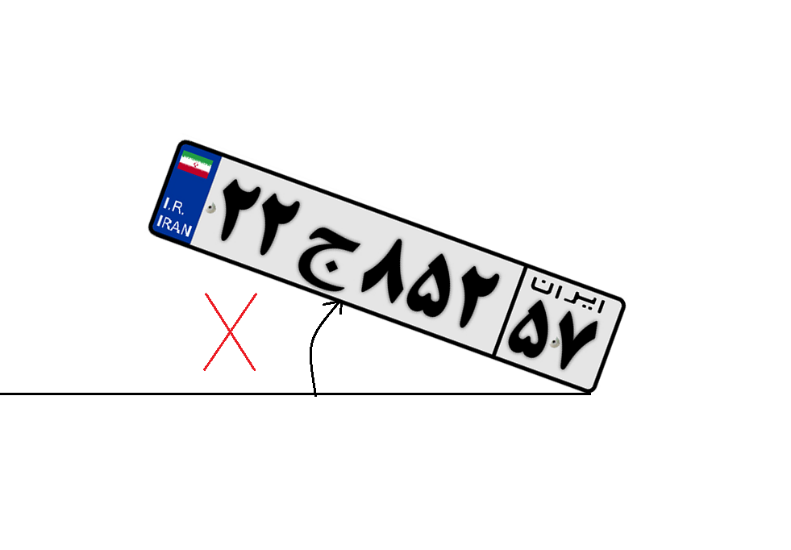
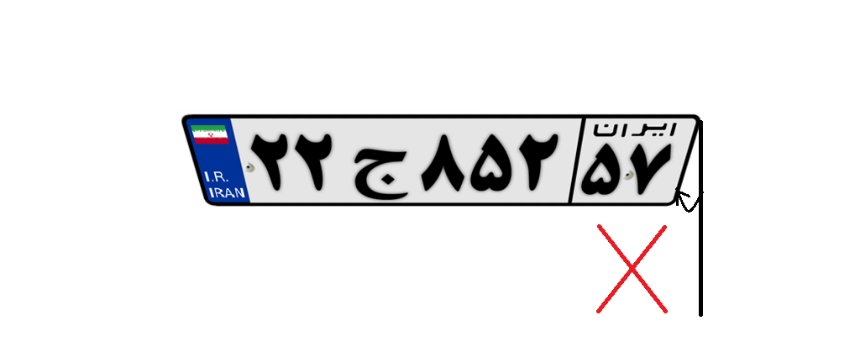
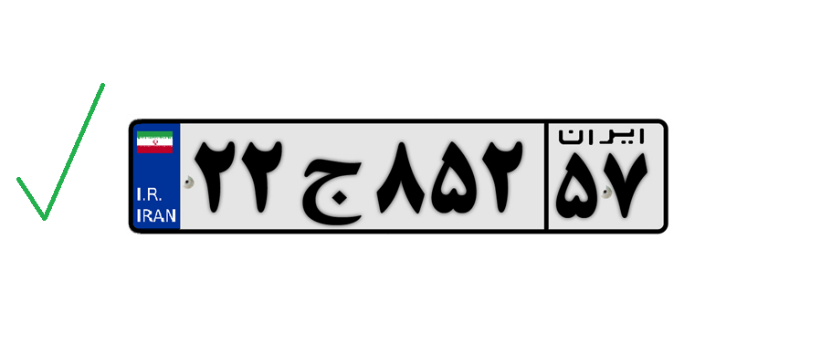
Camera angle

The angle of the camera, whether horizontal or vertical, should be in such a way that the license plate image with the horizontal and vertical direction has the least possible angle and, if possible, close to zero. You can see an example of the inappropriate angles of the camera below:

Environmental light

In outdoor applications daily, you often do not need artificial light, but be sure to provide the right light at night, both outdoor and outdoors. It is recommended to use visible light if possible.

Simple Image with Low Light:

Highlight image sample:

Resolution

The resolution of the image should not be such that the image is very large or too small, usually the resolution should be such that the license plate has at least 2 pixels and at least 2 pixels.

Shutter speed

The shutter speed should be adjusted in such a way that the license plate image will neither darken nor darkened the image.

Image sample with inappropriate shutter speed (high shutter speed):

A few samples of the image with inappropriate shutter speeds (low shutter speed):

Under the day -to -day lighting conditions, the shutter speed is usually suitable for 1/2 or 1/2 and for the night of 1/2 or 1/2. The precise adjustment of the shutter speed depends on the light of the light and the speed of cars.

Frame rate

In applications such as low -speed parking lots, frame rates are suitable and in high speeds, the frame rate of 1 to 2 is suitable.

Other settings

Other camera settings commonly found in license plate cameras, including WDR, HLC, BLC, Gain, Contrast, etc., which are highly dependent on environmental conditions, adjust the license plate , excessive tensile, high transparency, high transparency.

license plate Conditions

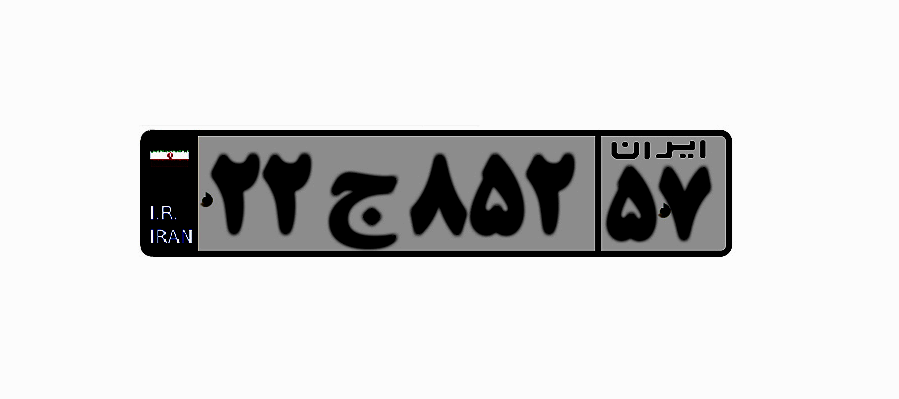
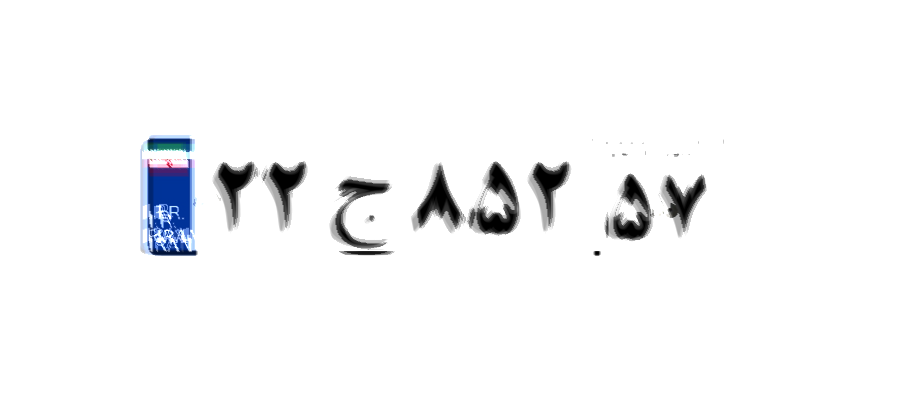
The license plate should not have a complication or dirt.

Inappropriate license plate sample (complicated and dirt):

The license plate should not be confused.

advanced divider
Start typing to see products you are looking for.